Superior performance professional combi oven equipped with the latest generation operating system and smart technology designed to manage any cooking process.
This manual contains all the information you need to use this appliance at its best.
If you do not fully understand any of the contents, please contact UNOX for further information.
| Symbol | Meaning |
|---|---|

|
Read the instruction manual |

|
Danger! Situation presenting immediate danger, or a hazardous situation which could cause injury or death. |

|
Risk of fire! |

|
Risk of electric shock! |

|
Risk of burns |
Failure to comply with the safety regulations, and any use or maintenance other than those indicated in this manual invalidates the warranty (for further details see www.unox.com, in the “Warranty” section), and relieves the manufacturer of all liability.
Keep this appliance out of the reach of children.
Cleaning and maintenance must be done by the user and NOT by children, especially where not supervised by an adult.
This appliance can only be used for cooking food in industrial and professional kitchens by qualified personnel, who have completed regular training courses. Any other use is not compliant with the scope of use and is therefore hazardous.
If the appliance is not working or if you notice any changes to the structure or operation, disconnect the electricity supply and contact an authorised UNOX customer assistance service. Do not attempt to repair the appliance yourself. For any repairs, please request UNOX original spare parts.
To ensure that the appliance is in perfect condition in terms of use and safety, maintenance and inspections should perform at least yearly by authorised service centre.
The appliance emits a sound level of below 70 dB.
UNOX reserves the right to make changes to improve the appliances and accessories at any time without advance notice.
Full or partial reproduction of this manual is forbidden without the consent of UNOX. The measurements provided are approximate and not binding. In the event of disputes, this document was originally written in Italian. UNOX is not responsible for any translation/interpretation errors.
While cooking and until all appliance parts have cooled, make sure to only touch the appliance control components or handle, because the external parts are extremely hot (temperature above 60°C | 140°F).
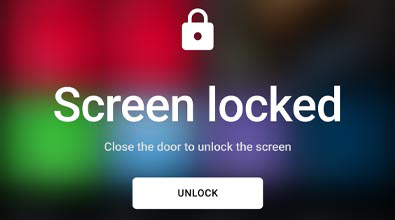
Cooking can only take place with the door closed, for safety reasons. If the door is opened, the oven stops temporarily and a message appears on the display. To resume cooking, close the door again.
In order to maintain optimum performance, do NOT open the door during cooking. If it is not possible to avoid opening the door, please do so very slowly and carefully, paying attention to the hot steam coming out of the oven cavity.
Wear appropriate protective thermal clothing and take great care when moving containers, accessories and other objects inside the oven cavity.
NEVER put any type of tray, hot or cold container, or other objects on top of the oven, even if it is turned off. DO NOT put highly flammable or heat-sensitive objects (e.g. plastic ornaments, lighters, etc.) near the appliance.
Leave at least 10 cm | 3.94” of free space around the oven.
The first time you use the appliance, some of the oils used for manufacturing may evaporate and produce fumes or unpleasant odours. These will gradually disappear as you continue to use the appliance.
Liquids or other foods should not be reheated in sealed containers, as these may explode.
To avoid burns, do not use containers filled with liquids or products that liquefy, heating up to higher levels than can be easily observed (Europe: IEC 60335-2-42: 2002 / AMD1: 2008)
If reheating beverages, these may reach boiling point and cause a delayed eruption. Be careful when handling the container.
The contents of any baby bottles and any baby food in jars must be mixed or shaken before consumption. Check the temperature to avoid scalding.
Only use utensils and containers that are appropriate for the chosen cooking mode (quick or traditional).
Before using the appliance, make sure that there are no non-compliant objects (instruction manuals, plastic bags, etc.) or detergent residues inside the oven cavity. Also make sure that the flue is free of obstructions and that there are no flammable materials in the vicinity.
When reheating food in plastic or paper containers, check the oven. Risk of fire.
If you notice any smoke coming from the appliance, disconnect the appliance from the mains power supply and keep the door closed to extinguish any flames.
Do not place sources of heat (e.g. grills, fryers, etc.), highly flammable substances or fuels (e.g. diesel, petrol, bottles of alcohol, etc.) near the appliance.
The appliance must be cleaned daily, removing any food residue. Failure to carry out cleaning as indicated could cause the surfaces to deteriorate. This could reduce the life of the appliance and cause danger (if not removed, fats or food residue on the inside could catch fire).
Do not clean the appliance with a steam or pressurised water jet.
Do not use highly flammable food or liquids while cooking (e.g. alcohol).
Do not open the compartments marked with these symbols. Only qualified personnel authorised by UNOX may access these compartments. Failure to observe this regulation invalidates the warranty (for further details see www.unox.com, in the “Warranty” section), and may cause damage or injury including death.
Any routine maintenance must be performed:
Carefully read the product safety data sheet before handling and using the detergent. NEVER touch the detergent with bare hands. The detergent must not come into contact with the skin, eyes or mucous membranes. In the event of contact with the detergent, refer to the safety data sheet.
When cleaning any component or accessory NEVER use:
These substances could cause permanent damage to the appliance surfaces and catalysts. Do NOT use these substances even when cleaning the appliance substructure or the floor under the appliance. The volatile emissions from these compounds may still cause damage.
Before starting a cleaning cycle, make sure that there are NO trays in the oven cavity, otherwise the washing is ineffective.
Do NOT open the oven door during a wash cycle as this could cause injury to eyes, mucous membranes and skin because of contact with the cleaning chemicals used. These chemicals are sprayed by the rotor in the cavity and moved by strong air currents.
Do NOT allow children to clean the appliance, especially when unsupervised by an adult.
Do NOT tamper with the detergent tank, its connections to the oven and the internal and external water circuit for any reason as this could cause a risk of injury or death.
Periodically check for rust stains inside the oven cavity: if any are found, contact a service centre urgently because the water is probably damaging the oven; prompt action will extend the lifespan of the equipment.
Pursuant to article 13 of Italian Legislative Decree 49 of 2014 “Implementation of the WEEE Directive 2012/19/EU on waste electrical and electronic equipment”

The crossed-out wheelie bin symbol specifies that the product was placed on the market after 13 August 2005 and that at the end of its useful life it should be collected separately and not disposed of with other waste. All appliances are made with recyclable metal materials (stainless steel, iron, aluminium, galvanized steel, copper, etc.) in percentages above 90% by weight. Before disposal, ensure the appliance is unusable by removing the power cable and all compartment or cavity closure devices (where present). At the end of its useful life, the product must be disposed of in such a way as to reduce any negative impact on the environment and make efficient use of available resources. Prefer prevention, preparation for reuse, recycling and reclamation, and remember “the polluter pays”. Please remember that illegal or incorrect disposal of the product incurs penalties, as provided for by current legislation.
In Italy, WEEE appliances must be delivered to:
The EU Directive on WEEE appliances has been implemented differently by each country. Therefore, if you want to dispose of this appliance, we recommend you contact your local authority or dealer for information on the correct disposal method.
Superior performance professional combi oven equipped with the latest generation operating system and smart technology designed to manage any cooking process.
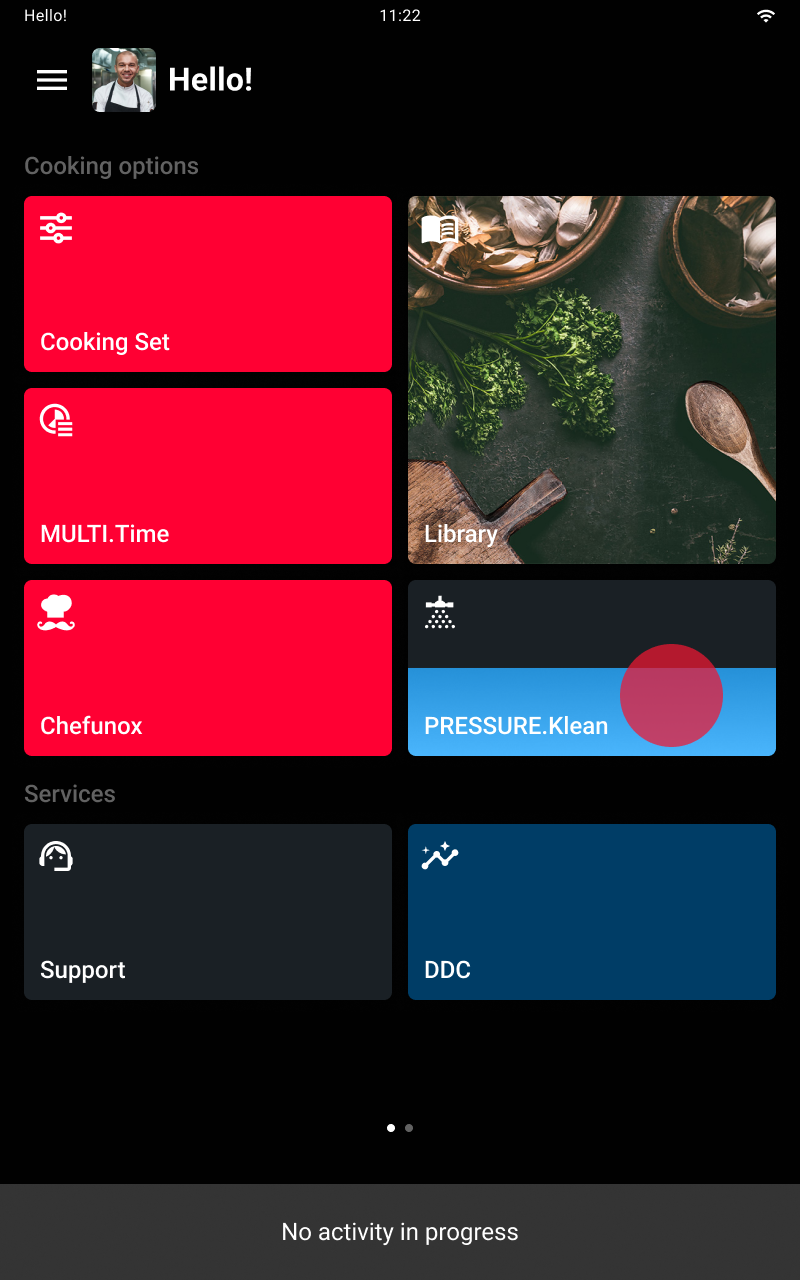
Cleaning speed ovens is no longer a problem. CHEFTOP-XTM/BAKERTOP-XTM feature a PRESSURE.Klean automatic washing system integrated with a 1L | 0.26 US Gal capacity DET&Rinse Ultra tank and RO.Care water filtering system to guarantee up to 1300L | 343.4 US Gal of filtered water. That's not all: thanks to the SENSE.Klean sensor, the oven is able to accurately detect the degree of dirt and to suggest the most suitable washing mode to avoid waste. It does everything!
The innovative Digital.IDTM control panel has been completely redesigned to ensure an unparalleled usage experience. A fresh, simple and intuitive design that allows you to monitor and control your oven with the speed of a touch.
The door with push-to-close function allows maximum speed in taking in and out of the oven. When the oven is closed, just push the door for instant closure. Greater freedom of movement, greater simplicity in actions.
The cooking chamber of the CHEFTOP-XTM/BAKERTOP-XTM ovens is made of 316L steel, the one ships are built of to withstand the aggression of sea waters. Combined with RO-Care, it allows to avoid water treatment with osmosis systems even in case of high levels of chlorides.
The high-flow fans distribute the air in a powerful and homogeneous way on each tray, from the first to the last. Uniformity and cooking speed at the highest levels.
CHEFTOP-XTM/BAKERTOP-XTM ovens use special high power intensity straight line resistances that produce heat quickly, minimizing temperature recovery times and optimizing air flows.
A space for the Det&RinseTM detergent bottle and for the built-in RO.Care water filter. A compartment under the oven which contains everything you need for the daily care of your oven.
Digital.IDTM is the most advanced operating system ever installed on an oven. Fast and intuitive interface with hyper-connection functions powered by artificial intelligence.
With Digital.IDTM you can access the interface of your ovens on all your devices, wherever you want, whenever you want, without the need for high-speed internet connection. Import any customization and recipe on all your ovens and devices via the Digital.IDTM app.
Create your Digital.IDTM and log in to your CHEFTOP-XTM/BAKERTOP-XTM oven connected to the internet: memorize your cooking programs, the configuration of your home page and all the customizations of your oven directly on the cloud. The account stays in constant sync with the most recent changes, also allowing you to edit them directly from your smartphone. You can log in to your account from any CHEFTOP-XTM/BAKERTOP-XTM oven connected to the internet and immediately have access to your settings.
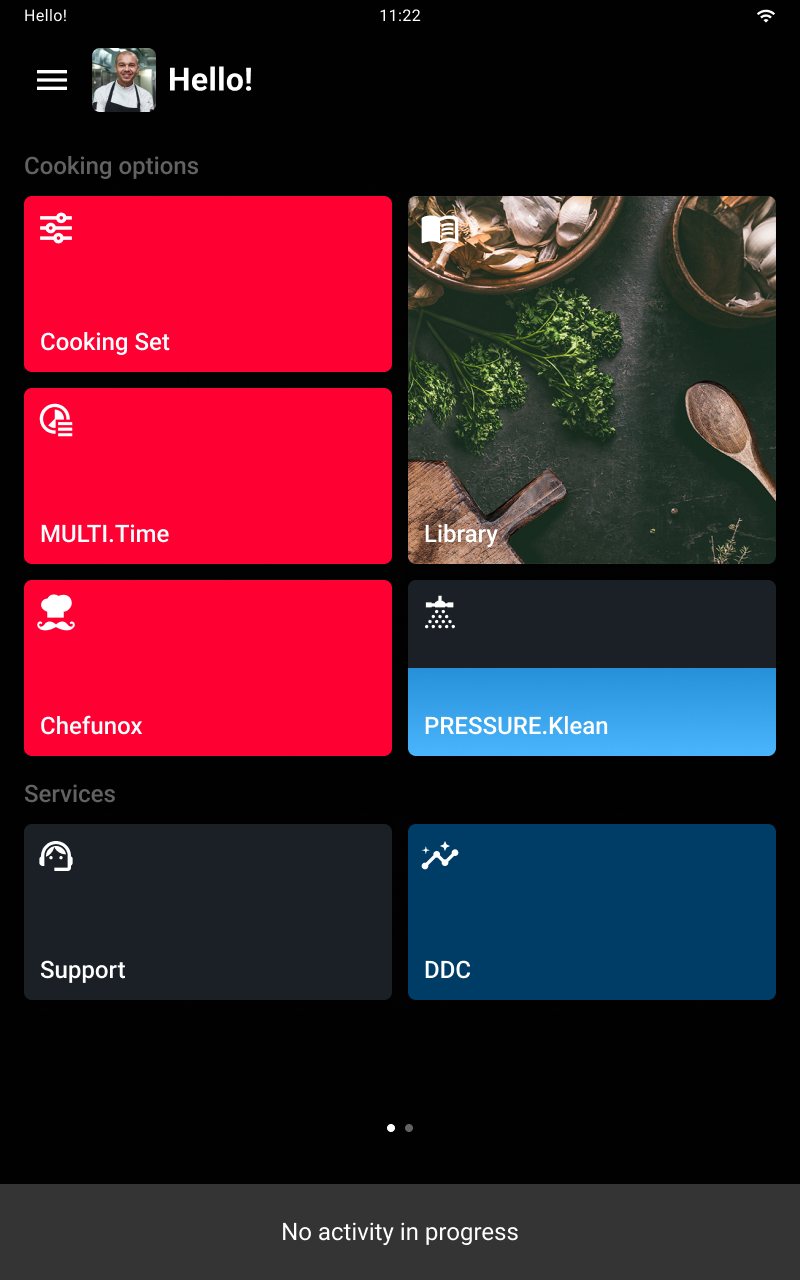
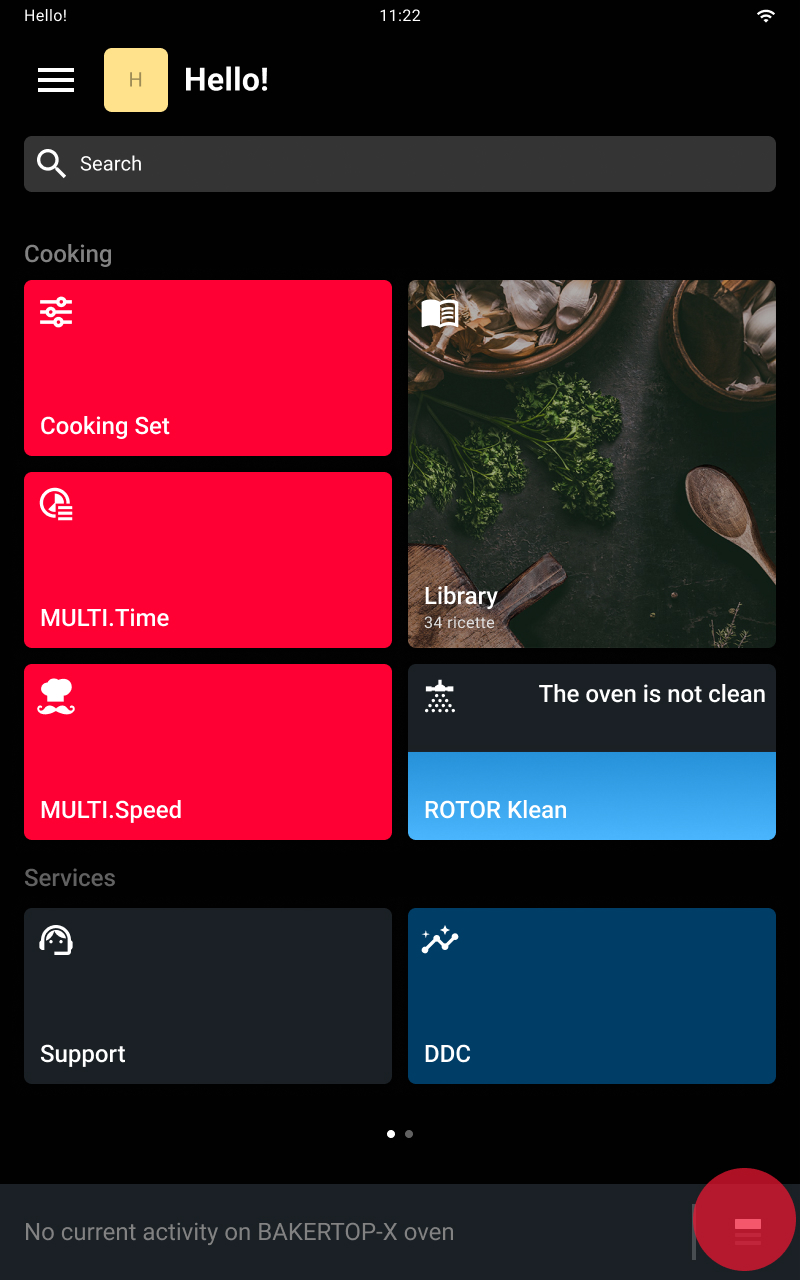
With the new widgets you work with the most intuitive interface ever seen on an oven. Customize the home screen according to your needs or choose a preset layout designed for your business to have your favourite features always in the foreground.
With the purchase of a Digital.IDTM oven you can receive free Premium base training that will teach you all the tricks to take 100% advantage of your oven from the very first days after installation.
Our Active Marketing Chefs are available remotely to show you everything you need, from basic functions to the most advanced technologies.
Do you need advice? Do you want to optimize the use of your oven? Do you want to perfect a cooking process? Do you need instructions for a recipe?
If you have activated the Premium* digital services you can book a Premium call with our Corporate Chefs directly from your oven and talk to them thanks to the internal microphone to receive up to 30 minutes a month of live advice. With the new Badge function you will be able to carry out instructions during the call, while with the Remote Control function you can allow the chef to set your oven remotely.
Do you need help? If you are a Premium* customer you can call our technical team directly from your oven and speak to our operators via the internal microphone. Moreover, thanks to the built-in chat and camera function of the Digital.IDTM app you can send messages and images to help the team diagnose and resolve your doubts more quickly and accurately.
| Symbol | Gesture |
|---|---|
 |
TapTap the screen gently with one finger. |
 |
Tap and hold downTap on the screen and hold down until the desired action starts |
 |
Drag rightDrag your finger from left to right. |
 |
Drag leftDrag your finger from right to left. |
 |
Drag upDrag your finger from the right upwards. |
 |
Drag downDrag your finger from the right to downwards. |

Be careful, the on/off button turns the control panel on and off but does not disconnect the oven from the power supply. It is still live until its plug is taken out.
For safety reasons and to achieve excellent performance and results, cooking must be carried out with the door closed.
If you open the door during cooking, the oven heating elements are deactivated, the fan stops and a notification tells you that the display is temporarily locked.
Your oven’s control panel uses Touch control technology which lets you browse through the Digital.IDTM operating system simply by tapping the icons with clean, dry fingers (don’t use utensils).
All the apps are managed with cards, each of which allows full control of the contents of the app.
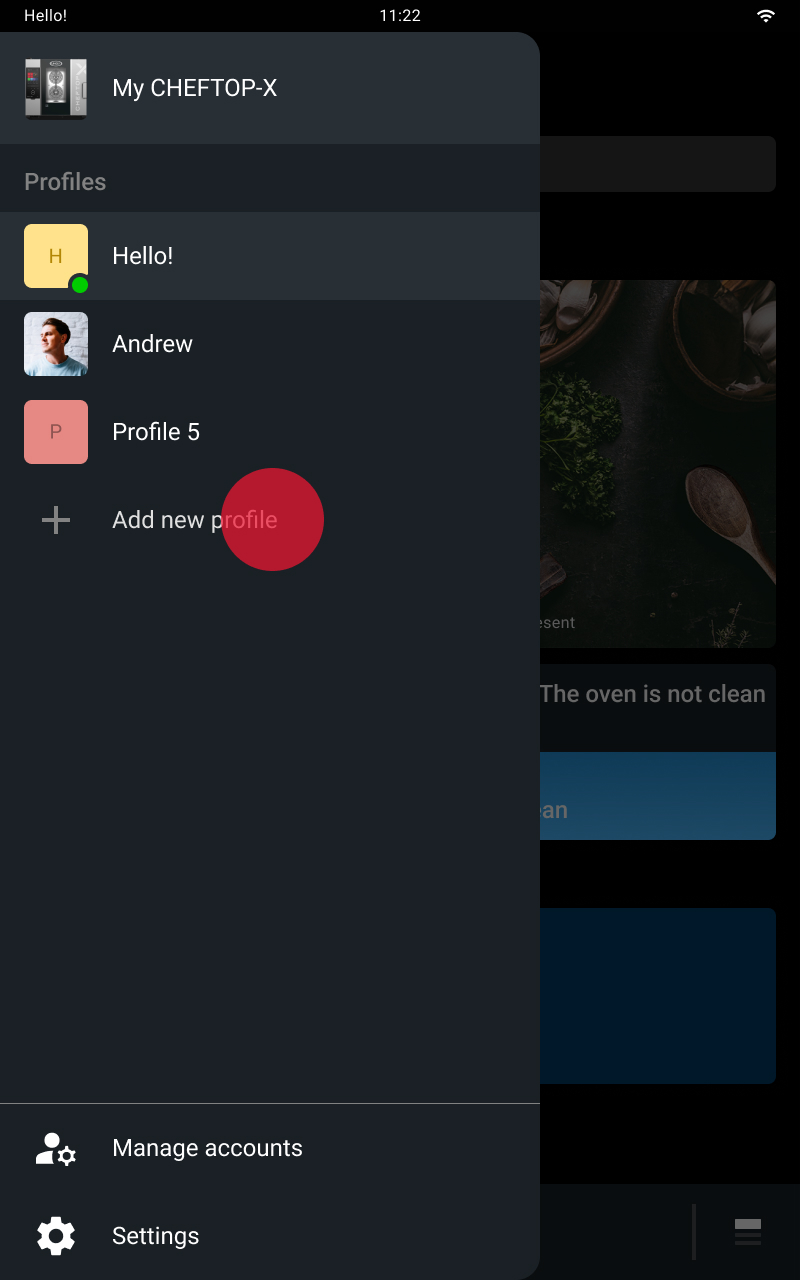
If you create a personal profile, you can store your cooking programs, decide the configuration of your Home Page and all the customisations of your oven.

Return to the Home Page, tap and hold down anywhere.
In the card that appears you can:

When customisation is completed, tap the save key to exit and confirm what you have set.

If you want to make personal settings:

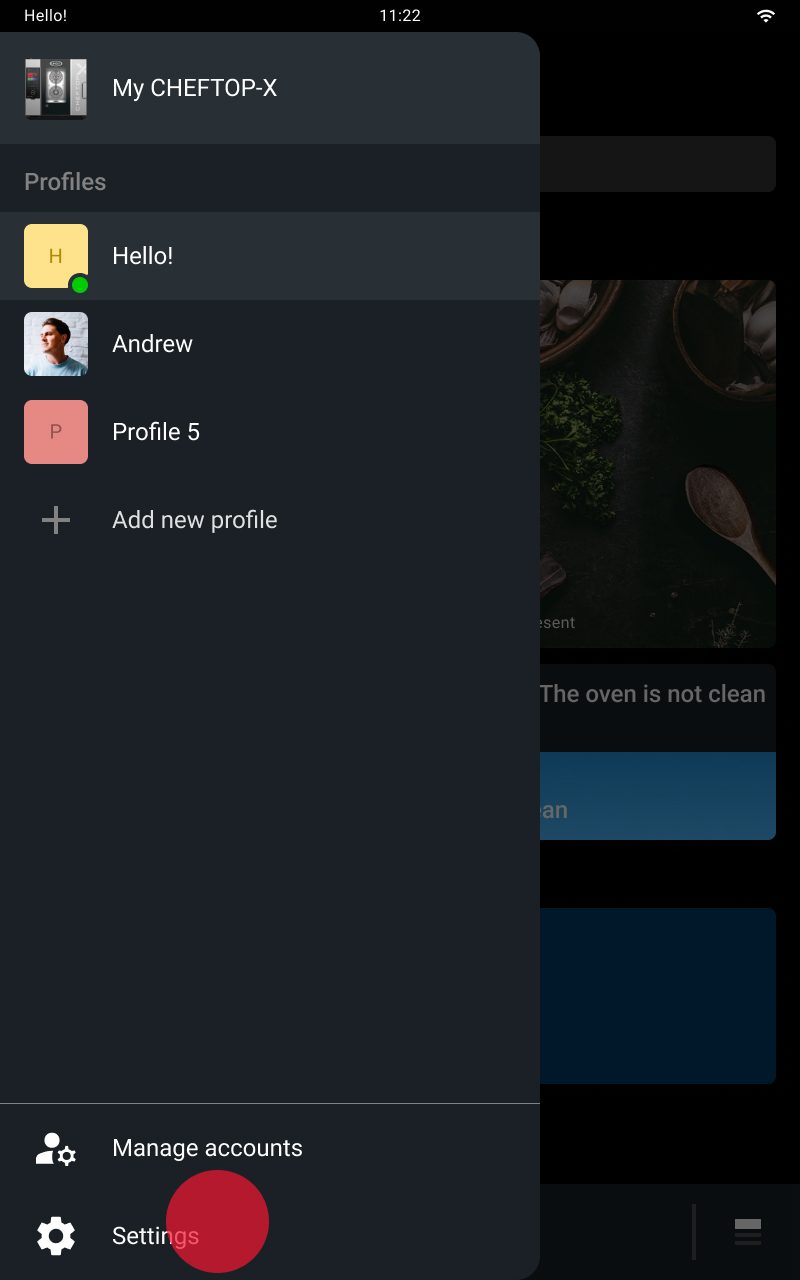
Tap the icon at the bottom right
Select the accessory you want to use
The slider menus let you see and manage several topics in a single card, permitting an overall view.
To display them, drag the card right or left.
To set a time value drag the number up or down.

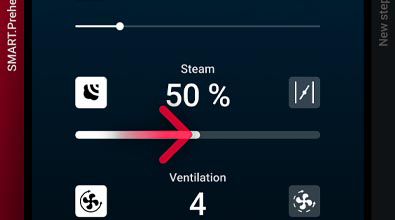
To set a slider value, drag the cursor right to increase it or left to reduce it.
Individual.CHEFUNOX
Smart function that prompts the user for feedback on cooking results. Use machine learning technology to process the feedback received, learn the user’s preferences and improve the preset cooking programs
Individual SENSE.Klean
Automatically set the temperature and preheating duration according to previous modes
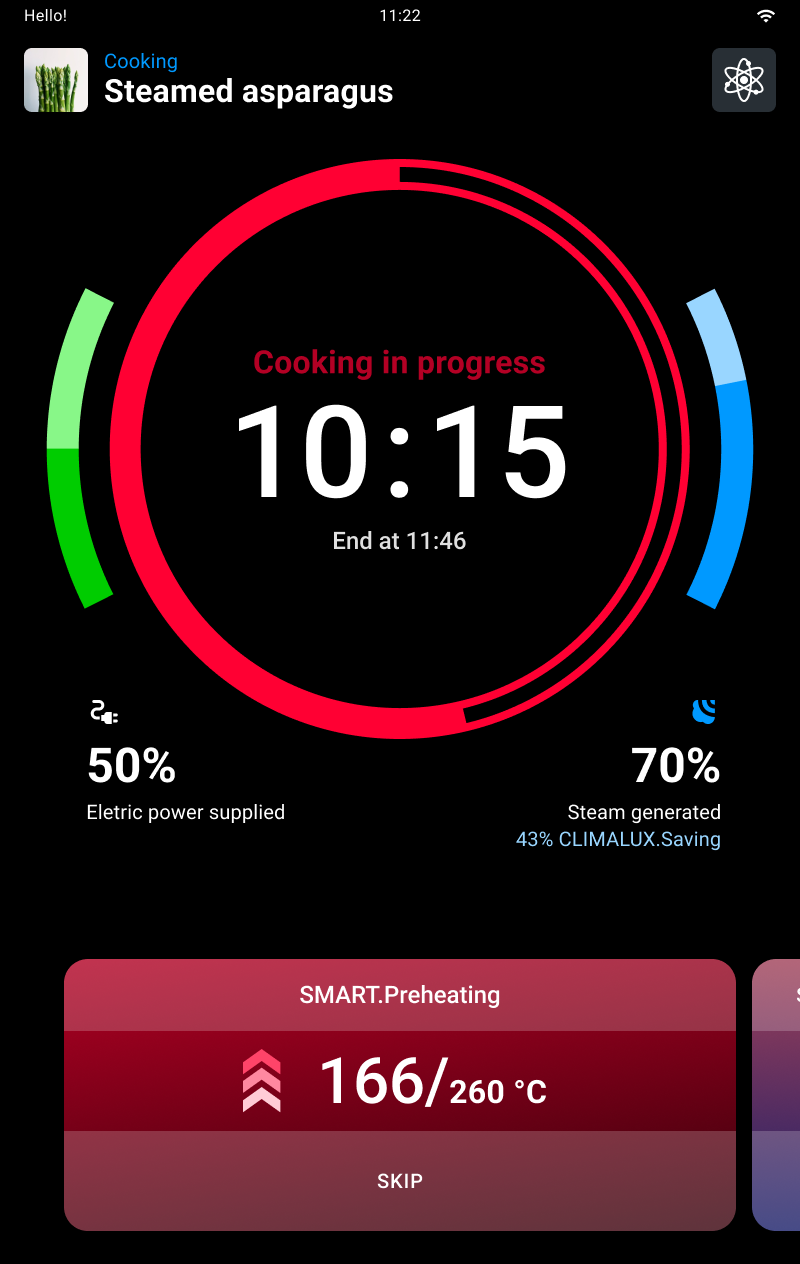
SMART.Preheating
Smart function to request and analyse feedback from the operator on the washes performed, to recommend the best wash to start according to how dirty the oven is
SENSE.Klean
Estimate how dirty the oven is and suggest the most suitable automatic wash
SMART.Energy
Automatic energy saving function that cuts water, electricity or gas consumption in cooking programs longer than one hour. Recognise when there is no food in the cavity and activate standby mode, reducing the temperature and saving energy. Analyse oven use to provide useful energy saving tips (e.g. signals if the door is left open for a long time)
HEY.Unox
Voice recognition technology for interacting with the oven, giving commands and receiving audio-visual feedback on the panel
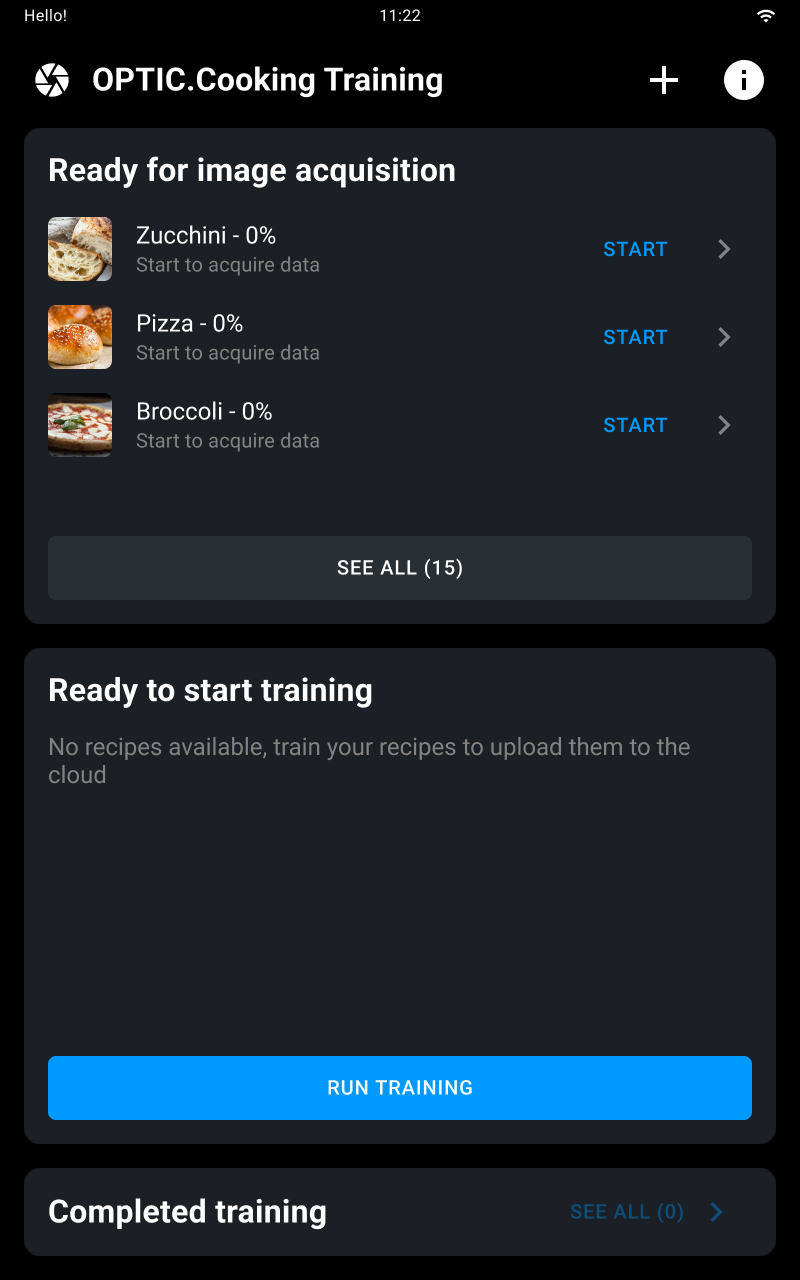
OPTIC.Cooking
Smart technology enabling the oven to recognise the food and automatically start the correct cooking program when operating in MULTI.Time mode
UIP (Unox Intelligence Performance) technologies allow the oven to constantly monitor each preheating and cooking process.
In this way the software that manages the oven independently modifies the conditions to ensure cooking results that are always perfect!
Below you will find the UIP technology available on your oven:
ADAPTIVE.Cooking
Automatically adjust cooking parameters according to the load to guarantee repeatable results
DRY.MaxiTM
Rapidly remove large quantities of humidity from the cooking cavity
STEAM.MaxiTM
Rapidly produce a large quantity of steam in the cooking cavity
AIR.MaxiTM
Automatically invert continuous and pulse fan mode
CLIMALUXTM
Continuously measure and adjust the humidity in the cooking cavity
AIR.Tornado
Improve and speed up cooking when the oven is fully laden, thanks to the possibility of increasing the oven fan speed to 3600 rpm
Cooking can be performed as follows:
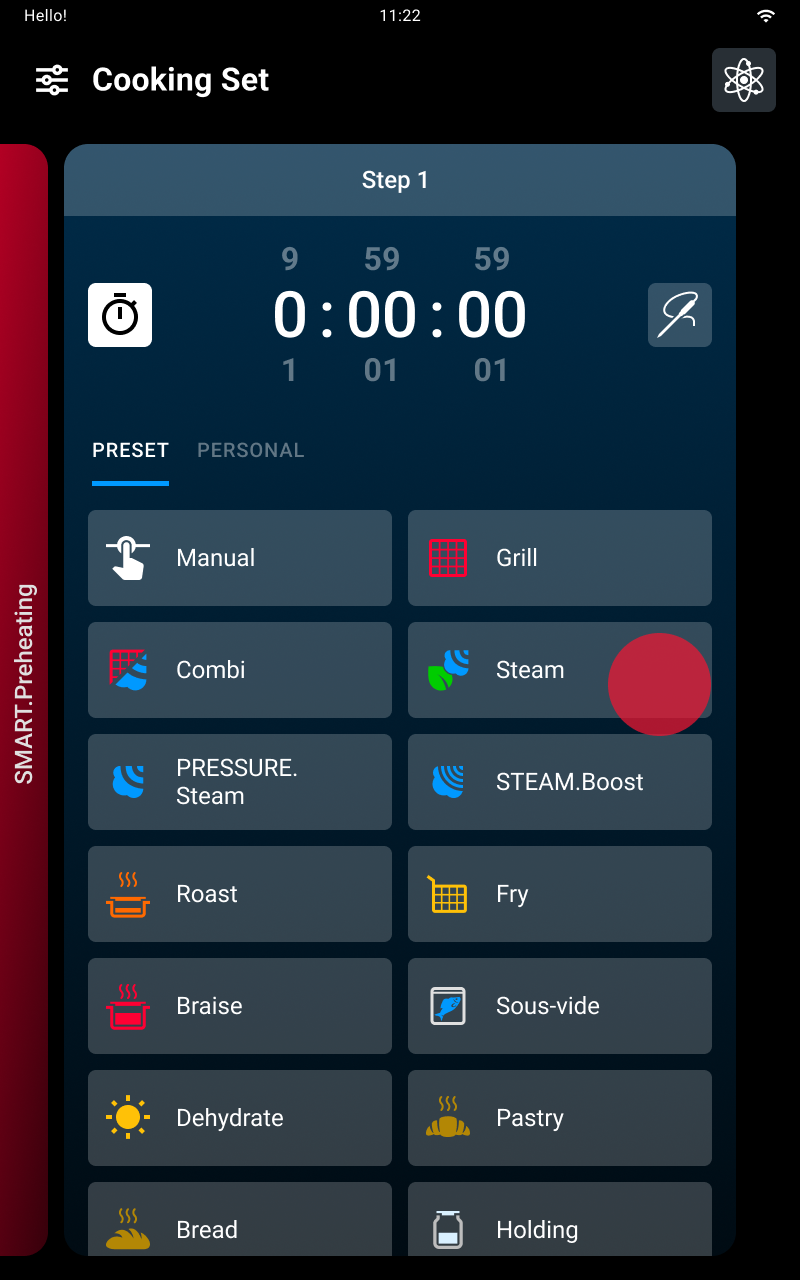
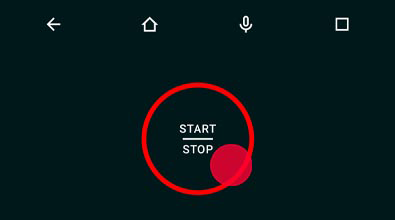
To start all cooking cycles, irrespective of type, tap
the start/stop button
To start or create a Cooking Set manual cooking cycle, you must set the cooking time and select either:
The recipes you have previously saved are collected in the Library app: to start them, tap the recipe you want and tap the start/stop button
The Chefunox app contains the recipes created and tested by the UNOX chefs to help you achieve excellent cooking results.
If necessary, during cooking you can edit the recipe; in this event the variations are valid only for the cooking cycle in progress.
At the end of the cooking cycle you can save the edited recipe under another name (the UNOX recipes cannot be changed or deleted). Your edited recipe will be stored in the Library app.
The MULTI.Time app allows you to cook products that require different cooking times at the same time, under equal conditions (temperature, humidity, fan speed).
If you use this app, the oven maintains the cavity conditions you have set for an indefinite period. You can also set additional cooking timers that will alert you when the relevant tray is ready.
Cooking cycles end when the anticipated time elapses or when the core temperature set is reached (if applicable).
If you tap and hold down the start/stop button the cooking cycle in progress is interrupted.
At the end of the cooking cycle you can stop the buzzer by tapping the stop buzzer button. If you open and close the door you can see the cooking summary screen.
Carefully read the product safety data sheet before handling and using the detergent. NEVER touch the detergent with bare hands. The detergent must not come into contact with the skin, eyes or mucous membranes. In the event of contact with the detergent, refer to the safety data sheet.
Before starting a cleaning cycle, make sure that there are NO trays in the oven cavity, otherwise the washing is ineffective.
Do NOT open the oven door during a wash cycle as this could cause injury to eyes, mucous membranes and skin because of contact with the cleaning chemicals used. These chemicals are sprayed by the rotor in the cavity and moved by strong air currents.
Do NOT allow children to clean the appliance, especially when unsupervised by an adult.
Do NOT tamper with the detergent tank, its connections to the oven and the internal and external water circuit for any reason as this could cause a risk of injury or death.
Periodically check for rust stains inside the oven cavity: if any are found, contact a service centre urgently because the water is probably damaging the oven; prompt action will extend the lifespan of the equipment.
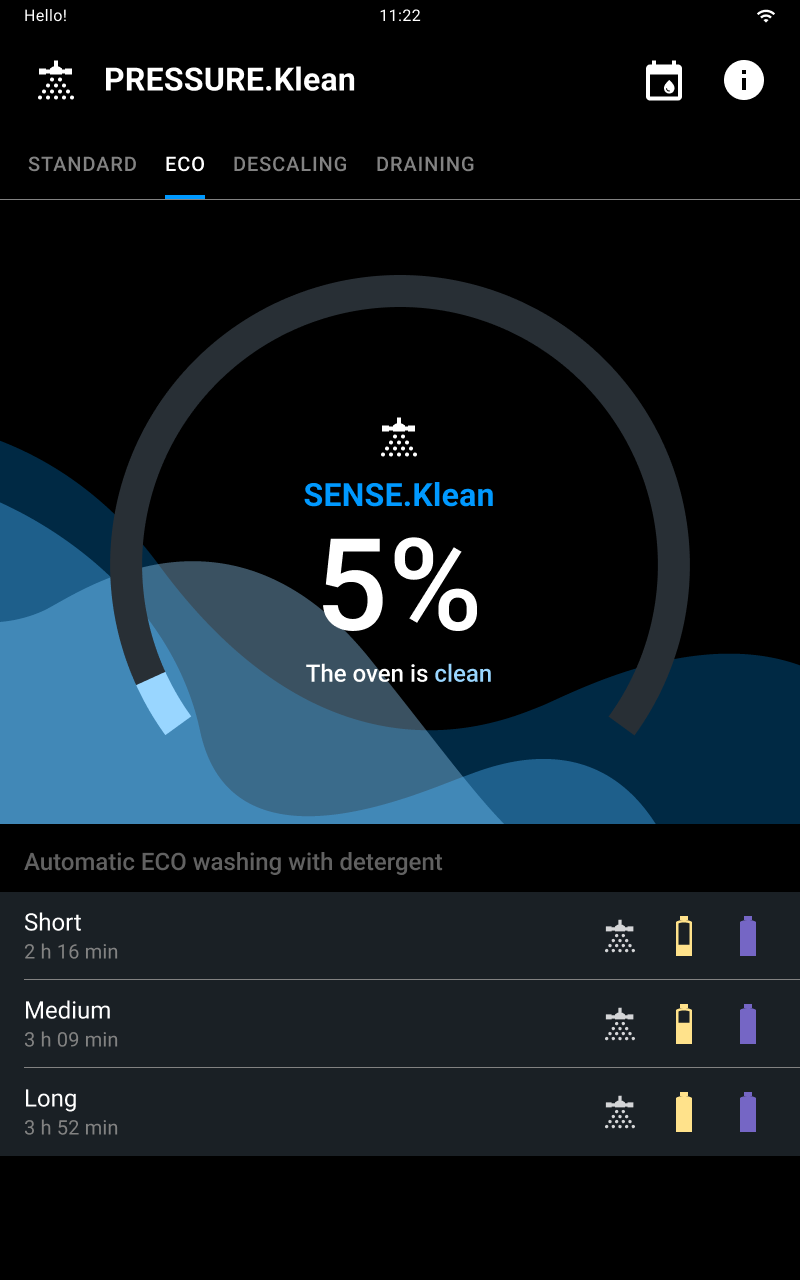
The ovens are fitted with the PRESSURE.Klean automatic washing system: to start a program to wash the oven cavity tap the washing button.
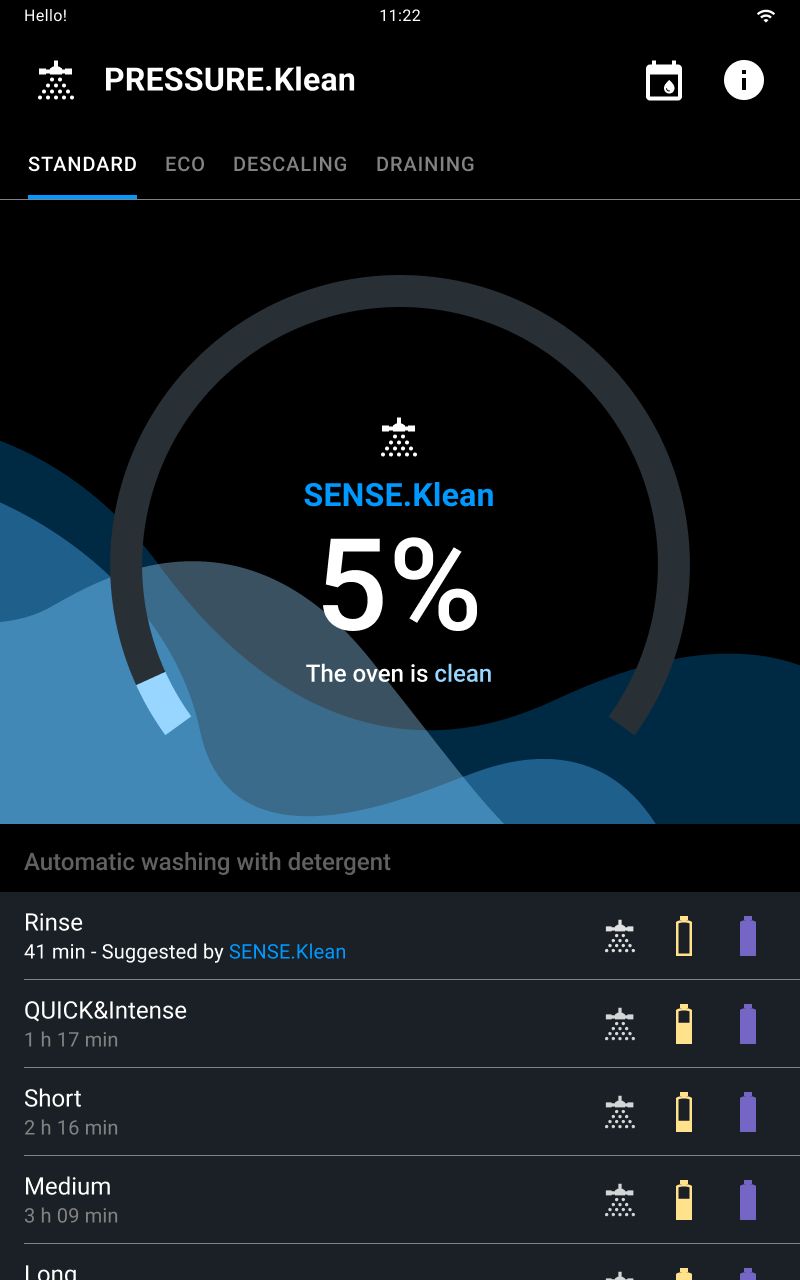
Tap the name of the wash that you think best suited to the degree of dirtiness of the oven cavity:
Tap the name of the wash that you think best suited to the degree of dirtiness of the oven cavity:
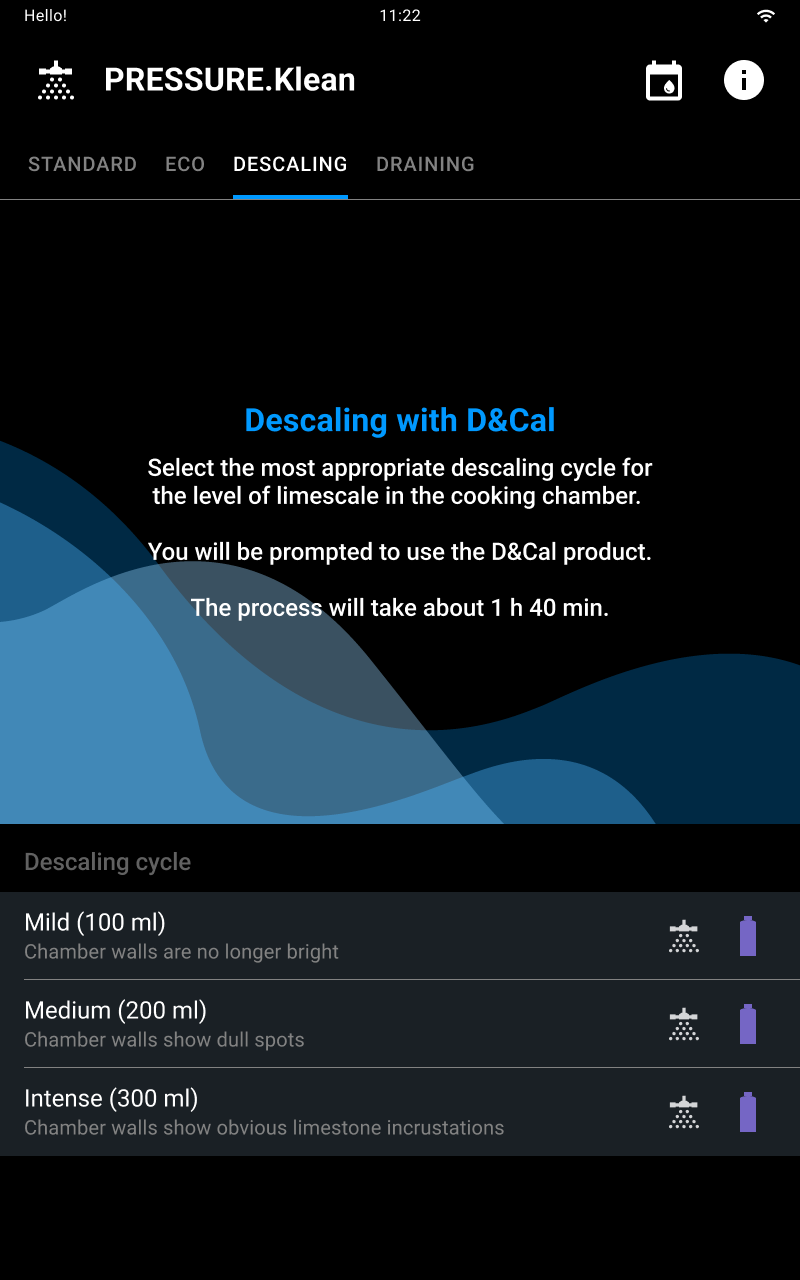
Select the descaling cycle based on the amount of scale in the oven cavity.
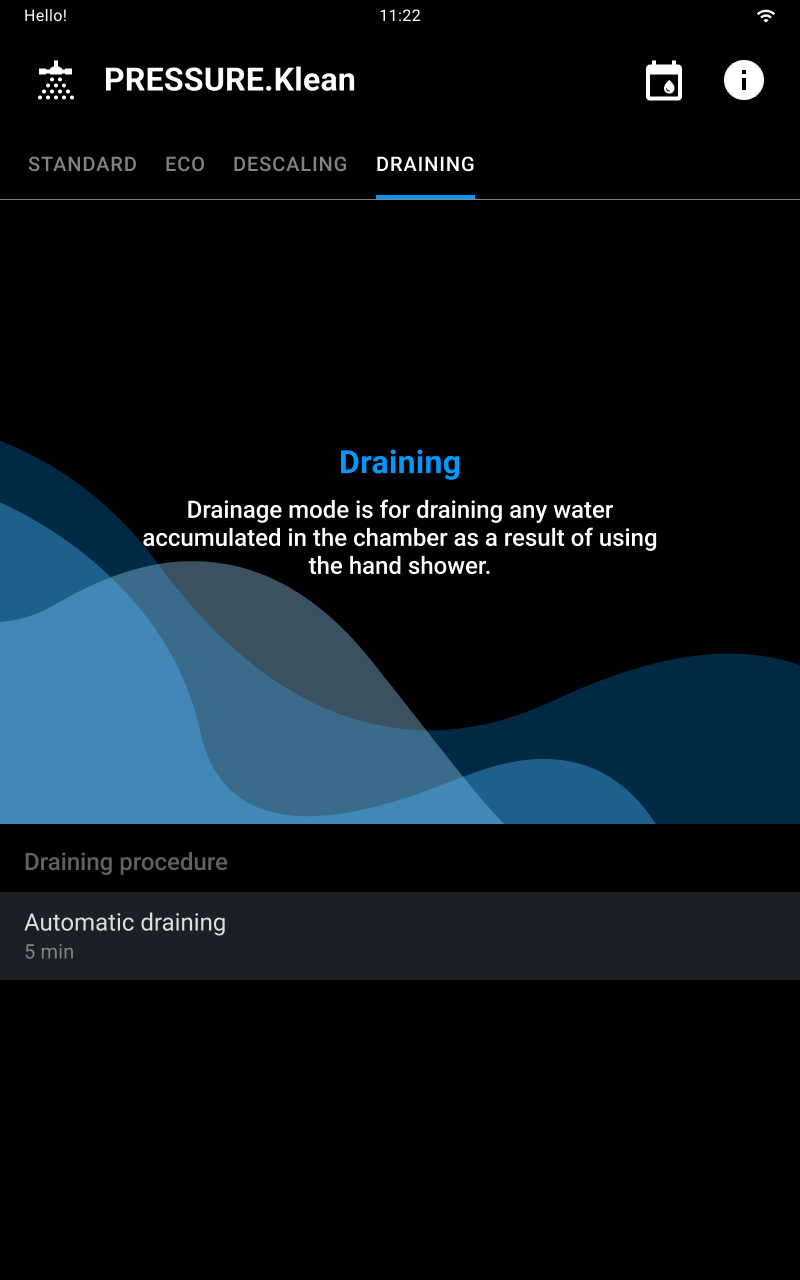
The draining mode is used to drain the water that has accumulated in the chamber after using the sprayhead. Select automatic drainage to start the procedure.

At the end of the wash a summary card will appear and a buzzer will sound that you can stop by tapping the STOP BUZZER button.

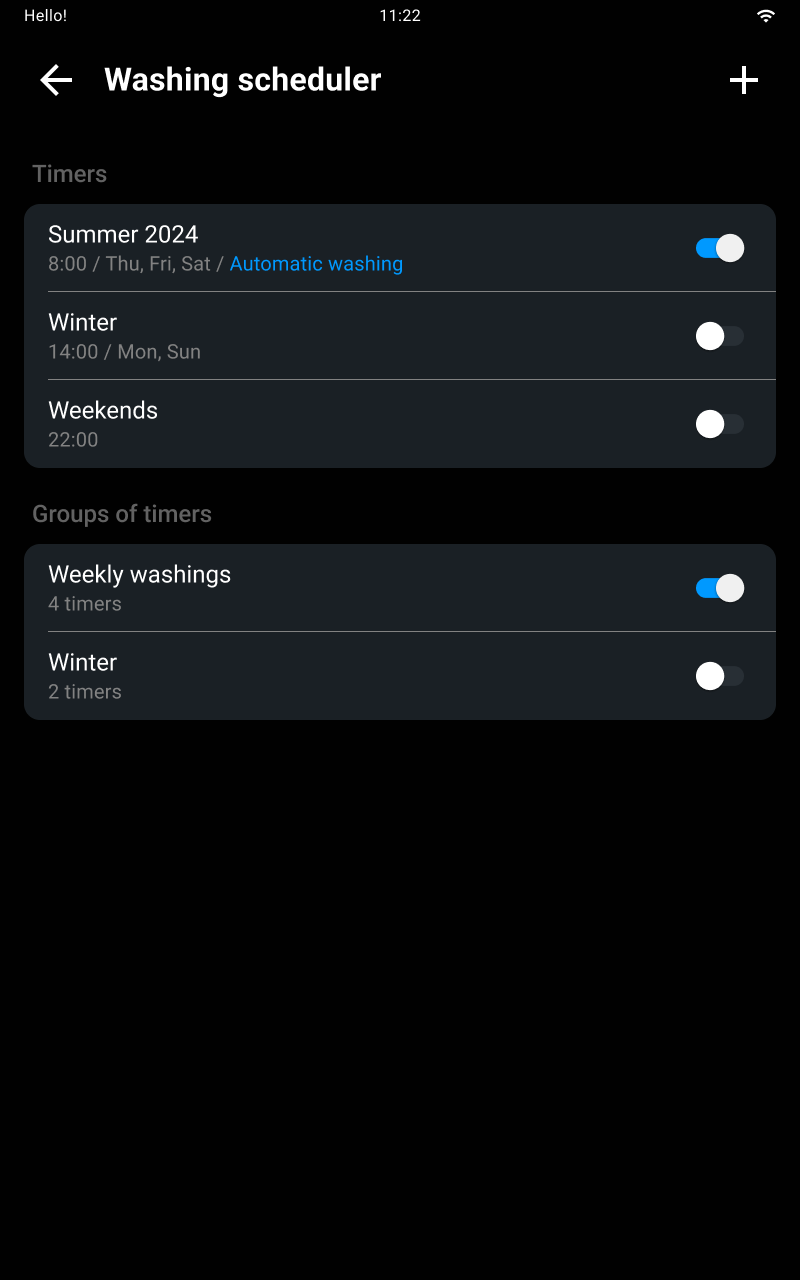
Tap the “Scheduling washes” icon on the main page to access the function.
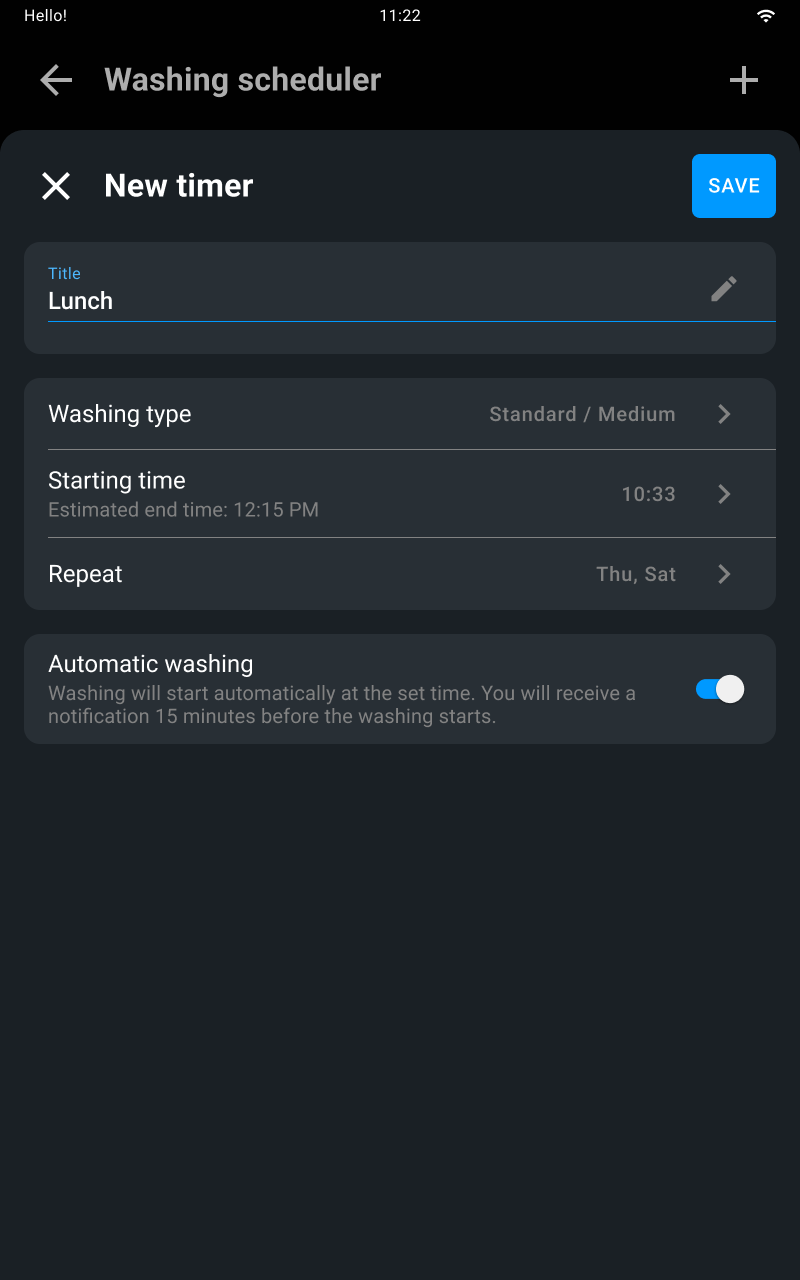
Tap the “Add” icon to create a new wash timer.
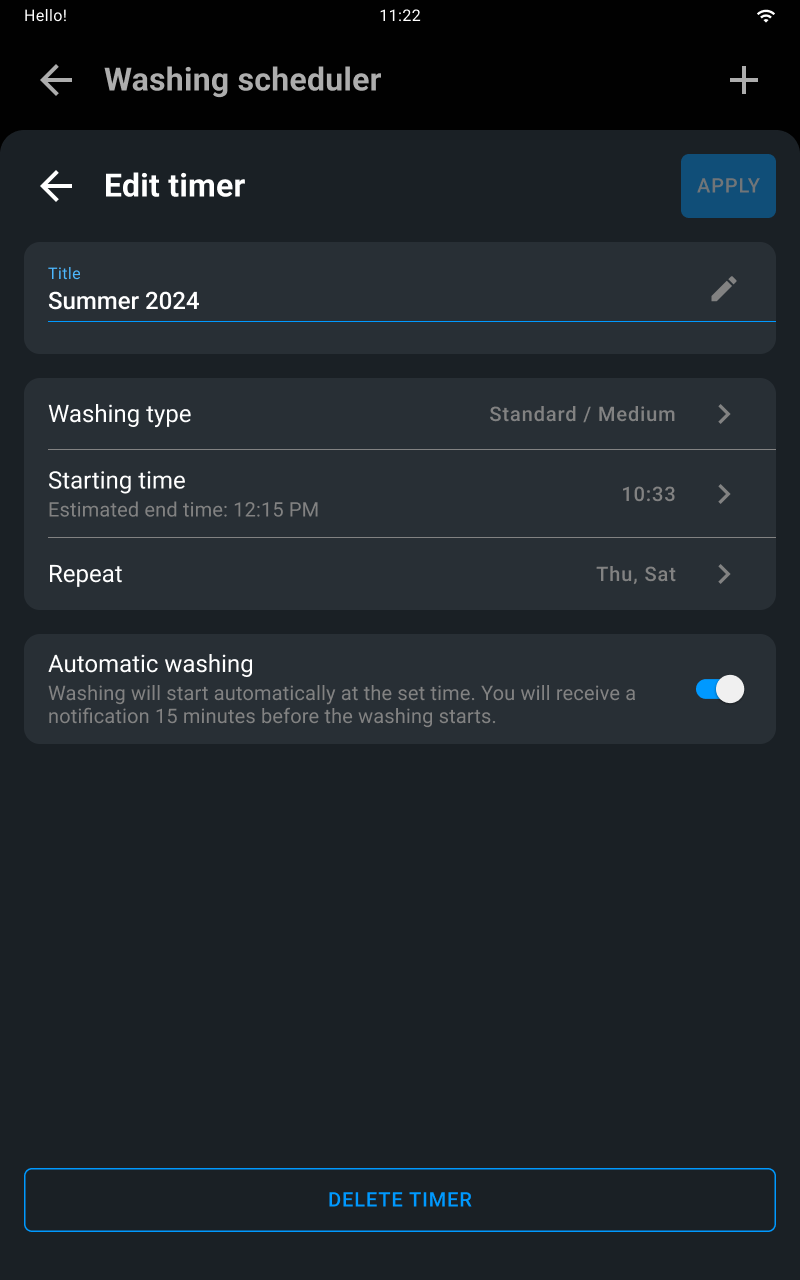
Enter a timer name, wash type, start time, weekly frequency (optional) and enable automatic start of scheduled washes if desired.
Once you have completed the required fields, save the scheduling.
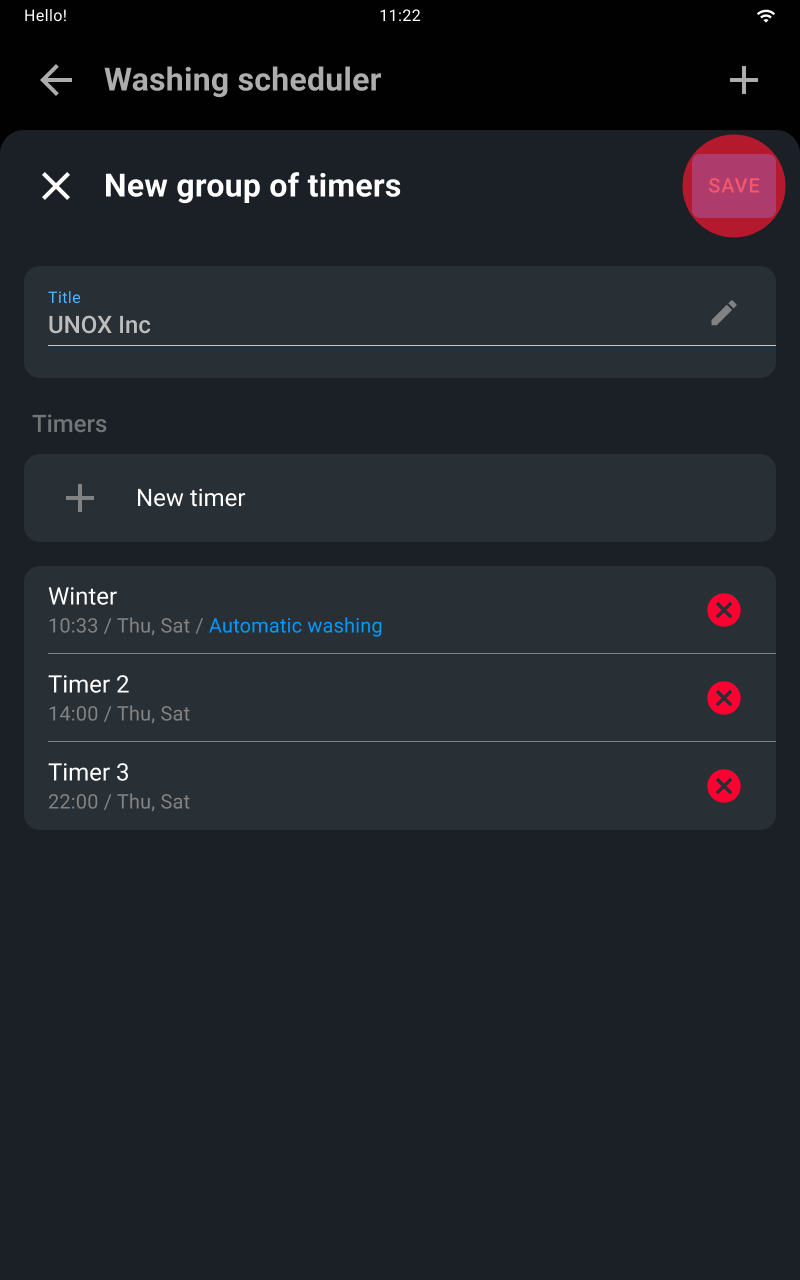
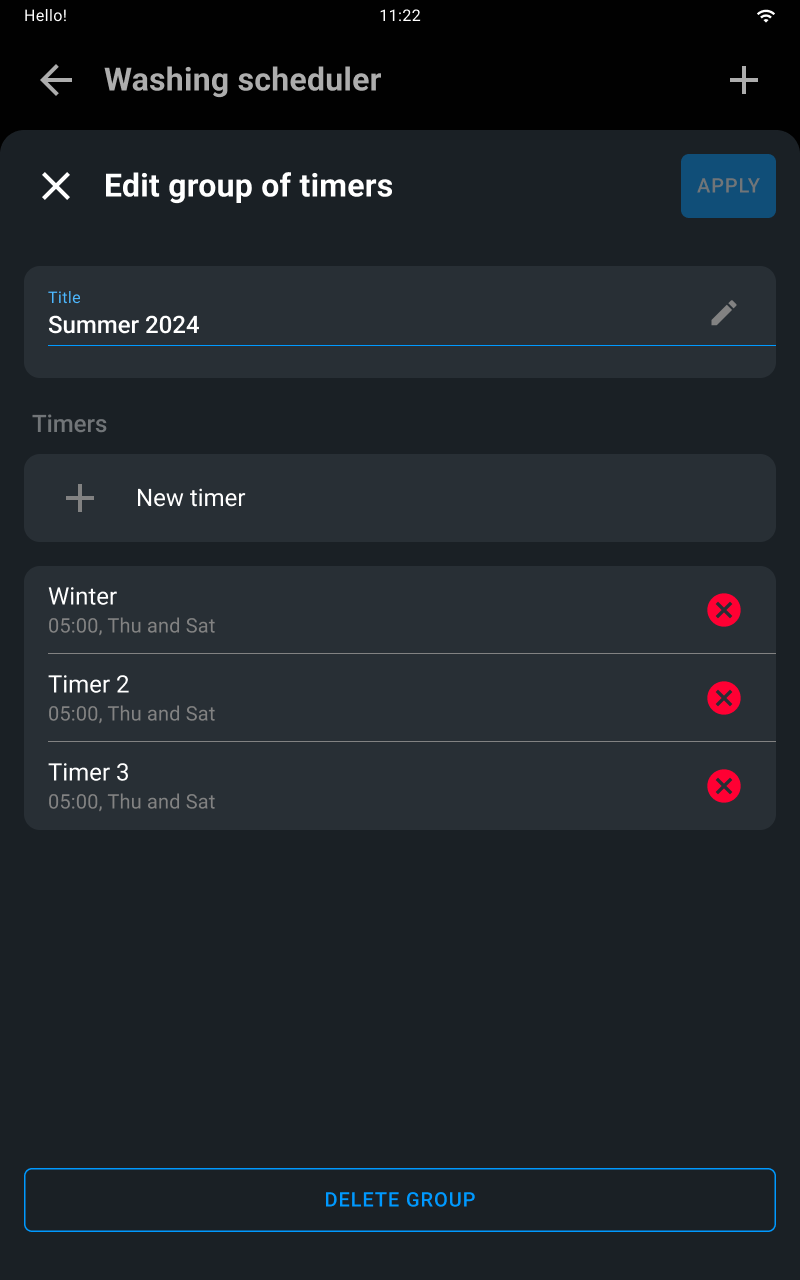
Tap the “Add” icon to create a new wash timer group.
Enter group name.
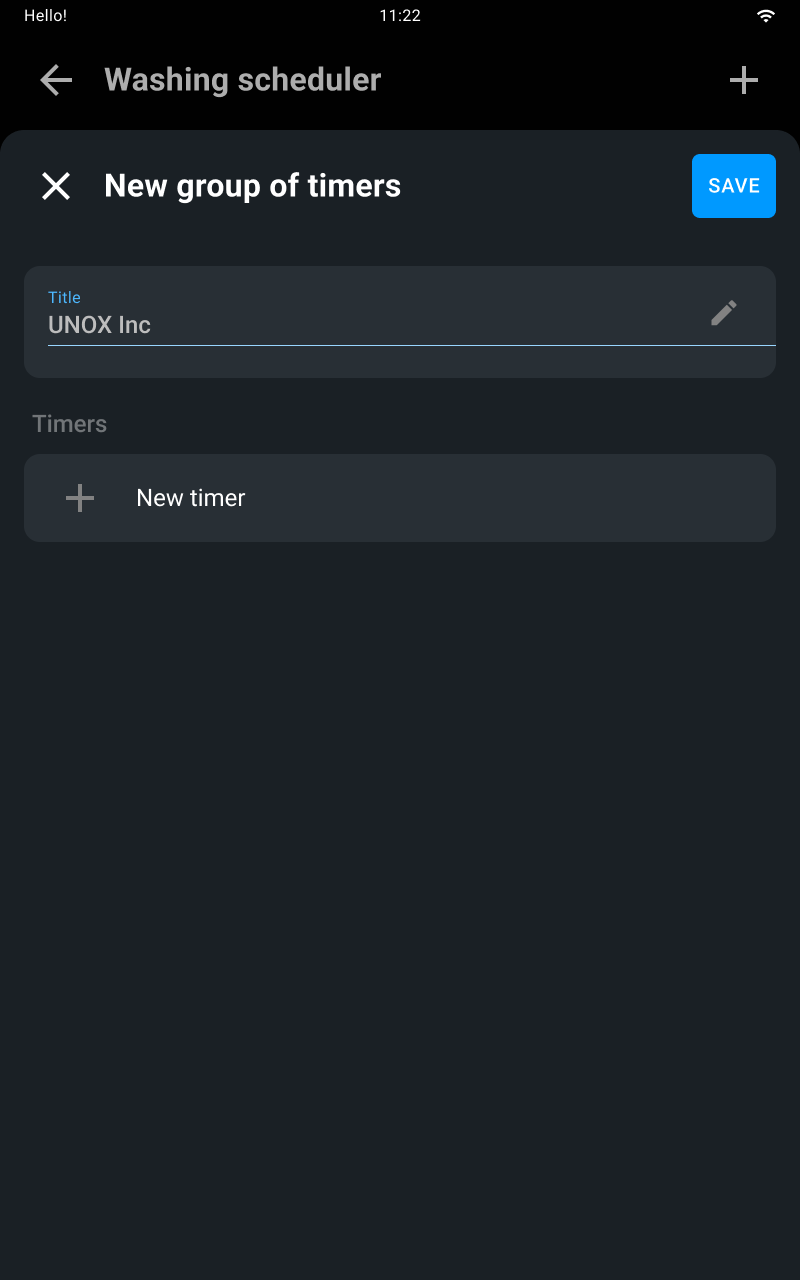
Creating new individual timers within the group. Once you have completed the required fields, add the timer to the schedule.
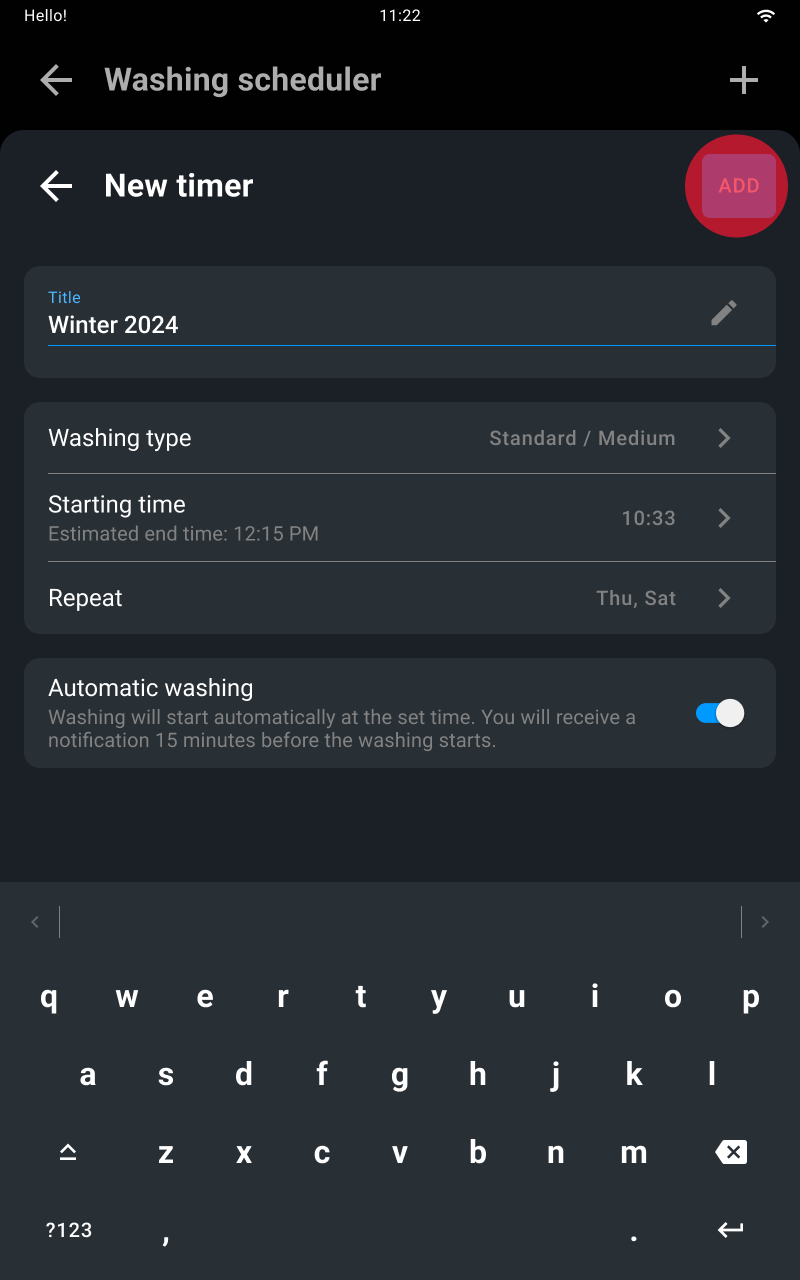
Once the desired timers have been added, save the scheduling.
You can enable or disable a timer or group of timers from the landing page using via the switch button on the right.
Tap the list of the desired timer to edit or delete it. Changes can only be applied if a change is made.
Tap the list of the desired timer group to edit or delete it. Tap a timer again to edit or delete it. Changes can only be applied if a change is made.
A note on the display tells you when you need to refill the Det&Rinse tank.

You must only refill the tank with 1 litre | 0.26 US Gal bottles of UNOX Det&RinseTM Ultra detergent, the only one approved and tested for washing the oven cavity.
Wear gloves to prevent your hands from coming into direct contact with the detergent. The detergent must not come into contact with the skin, eyes or mucous membranes. In case of contact with the detergent, follow the instructions on the safety data sheet.


Put the tank back in until it can go no further. Dispose of the gloves without touching the areas wet with detergent.
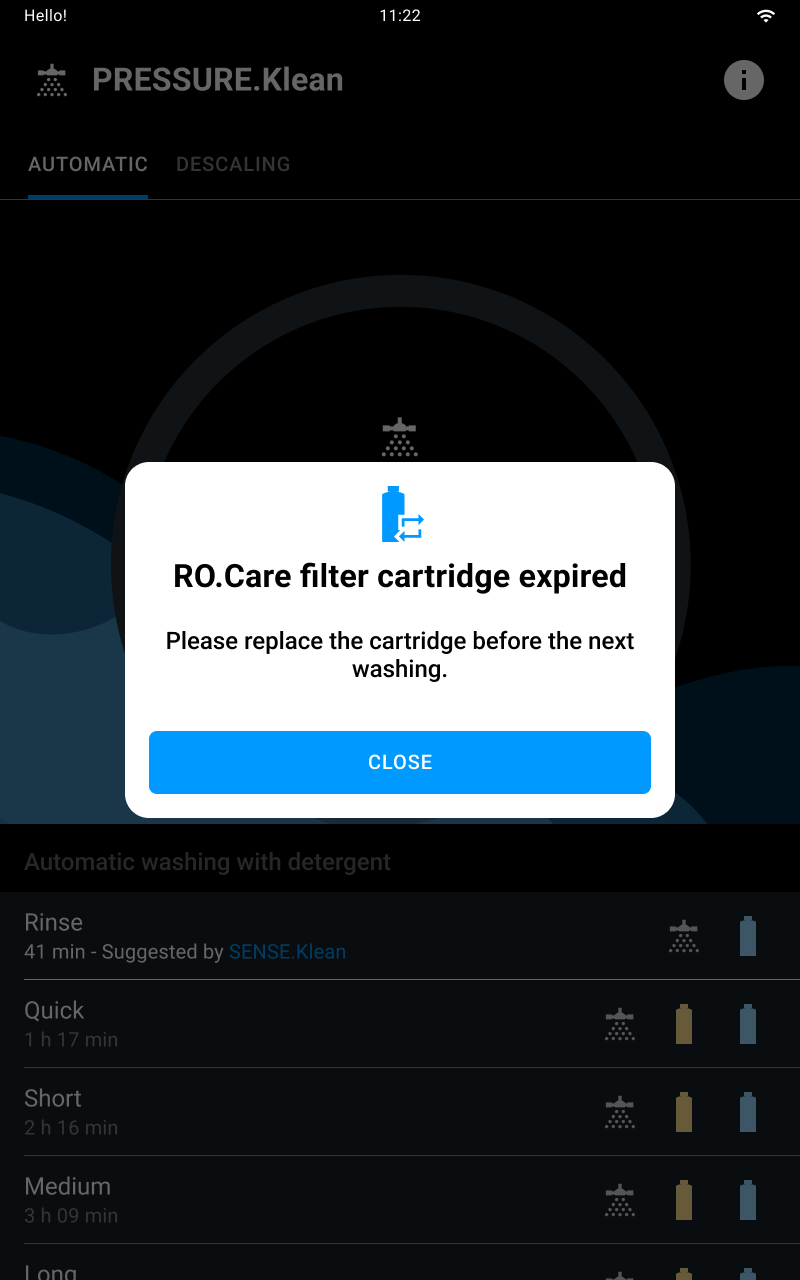
The oven features an RO.Care softener filter that must be replaced once a year or after the treatment of a number of litres calculated using this formula:
Litres (L) = 13000 | 343.4 Us Gal / Temporary hardness (°DH) in relation to the hardness of the customer’s mains water.
In both cases a note on the display tells you when you need to replace it.


Cooking Set lets you start a manual cooking cycle.
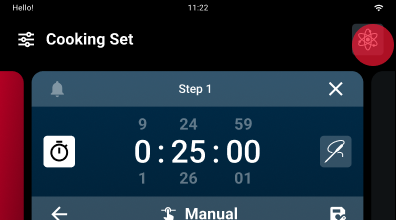
In manual cooking cycles you must set the following parameters independently:
Each manual cooking cycle is always composed of:
After setting all the parameters, you can either:
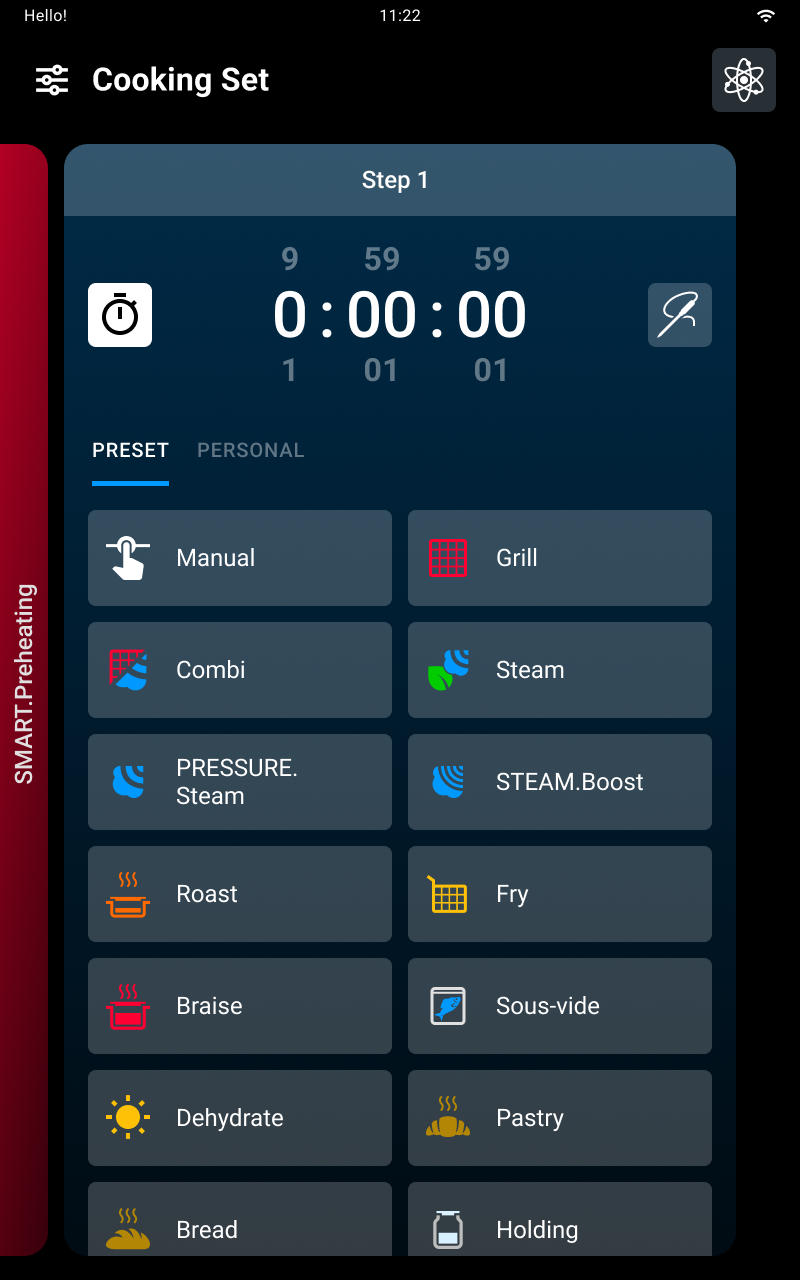
To start or create a manual cooking cycle, you must set the cooking time and select either:
To select the preset program you want tap its name.
After selecting the preset cooking program, if you wish, you can edit the preset parameters to suit your needs.

UIP (Unox Intelligence Performance) technologies allow the oven to constantly monitor each preheating and cooking process.
See further information about UIP technologies (Unox Intelligent Performance) here.
To edit the Unox Intelligence Performance cooking technology settings:
How to add a new cooking step
If necessary you can create cooking programs with several steps; each step can have different parameters:
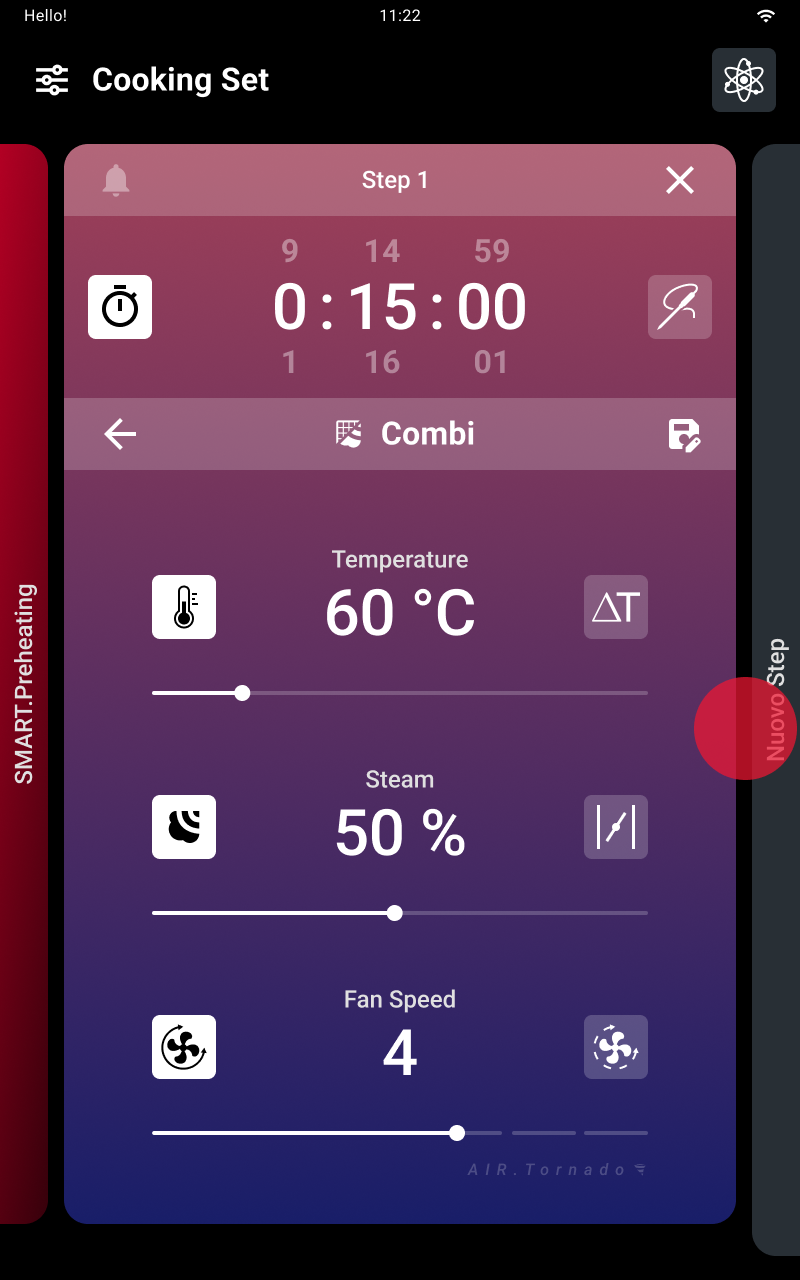
Before doing any cooking, it is very important to preheat the oven cavity correctly to temperature: therefore, when each cooking cycle starts, the oven is automatically preheated.
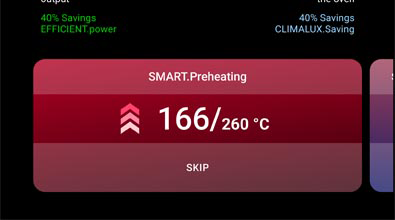
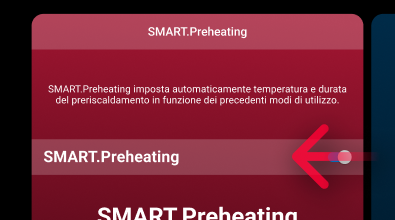
UNOX recommends that you use SMART.Preheating, an automatic preheating program that autonomously sets the preheating time and temperature; it also takes into account the dispersion of heat when you open the door and is activated when the oven moves from one step to the next, adjusting the oven cavity to the step’s new parameters.
To deactivate SMART.Preheating technology and manually set preheating, tap the preheating card and deactivate the technology by moving the cursor. To save the changes, tap the apply button. Then you must set the preheating time and temperature in the card that appears.
To stop preheating that’s in progress at any time, whether manual or SMART.Preheating, press the skip button and confirm.
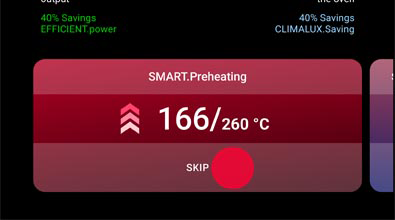
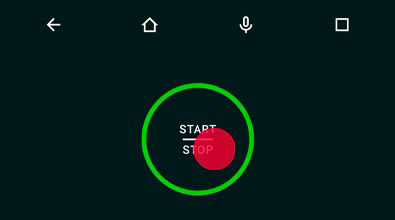
Tap START/STOP to start the cooking cycle: a manual or Smart.Preheating phase begins, depending on what you have previously set.
To stop preheating that’s in progress at any time, whether manual or SMART.Preheating, press the skip button and confirm.
See further information about preheating here.
When preheating is completed or after it has been stopped prematurely, a screen will remind you to put the food into the oven; when the door is closed the first step scheduled automatically starts.
Cooking cycles end when the anticipated time elapses or when the core temperature set is reached (if applicable).
If you tap and hold down the START/STOP button the cooking cycle in progress stops.
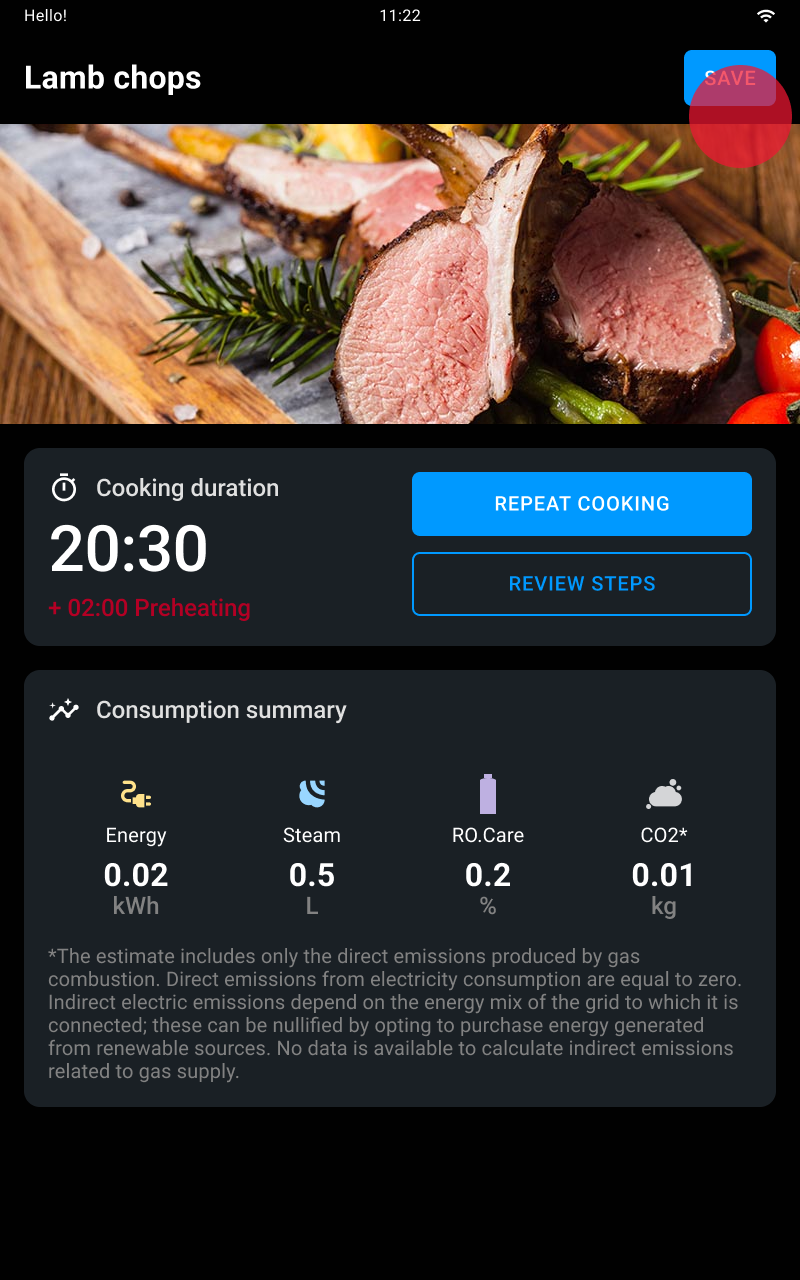
At the end of the cooking cycle a summary card will appear and a buzzer will sound that you can stop by tapping the stop buzzer button.
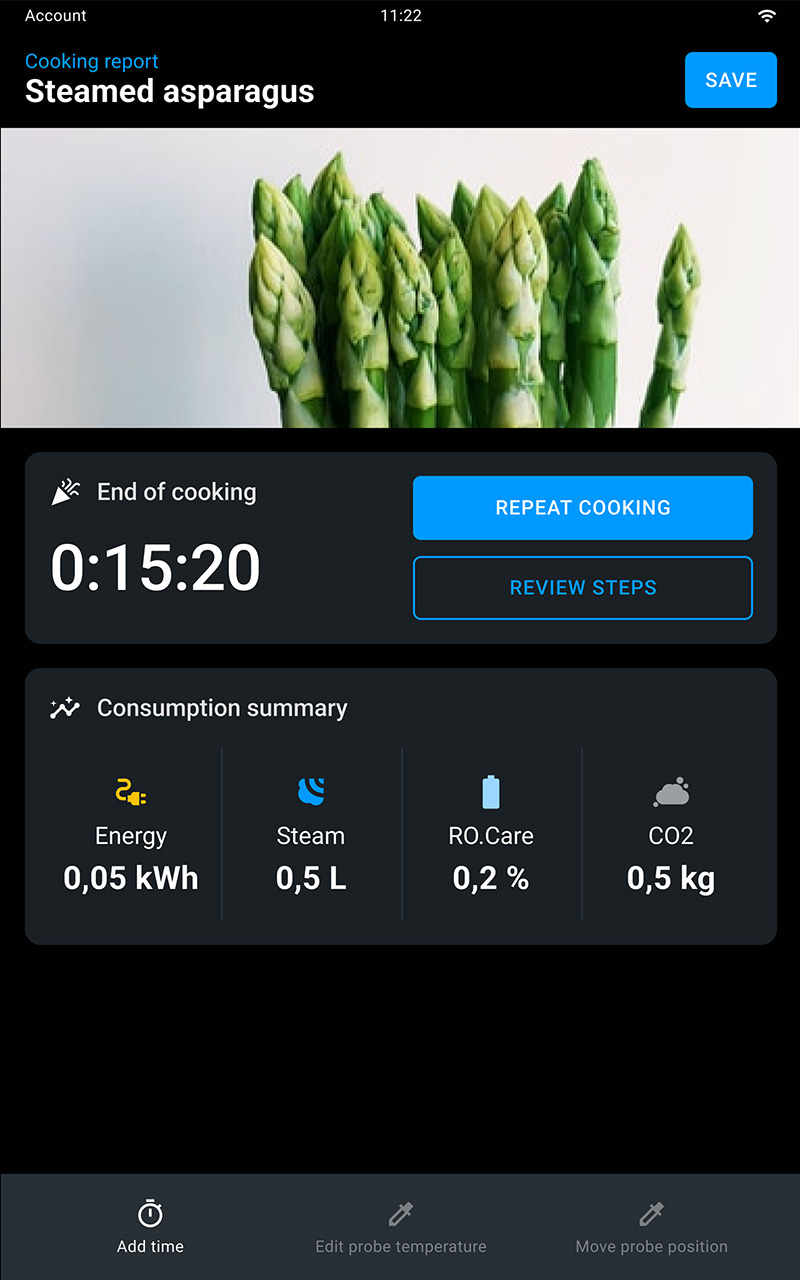
Then a card appears summarising consumption and possible actions after cooking.
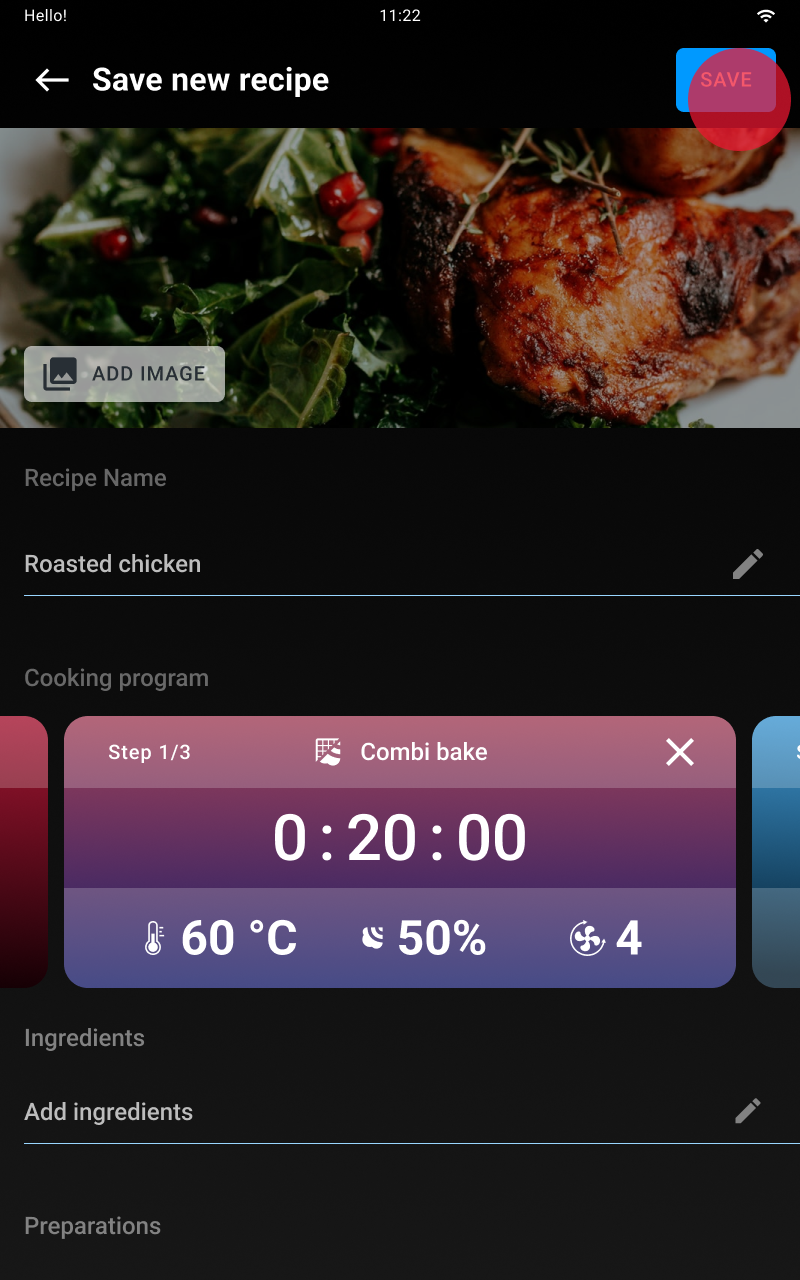
At the end of the cooking cycle you can save the recipe you have created:
The recipes you have saved are collected in the Library app: to start them, tap the recipe you are interested in and tap the start/stop button

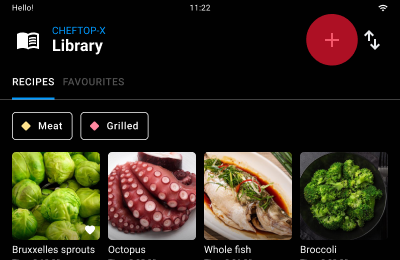
The Library lets you create or start a personal recipe you’ve previously saved.
See how to select and start a recipe here.
See how to create a personal recipe here.
Tap the recipe you want in order to select it.
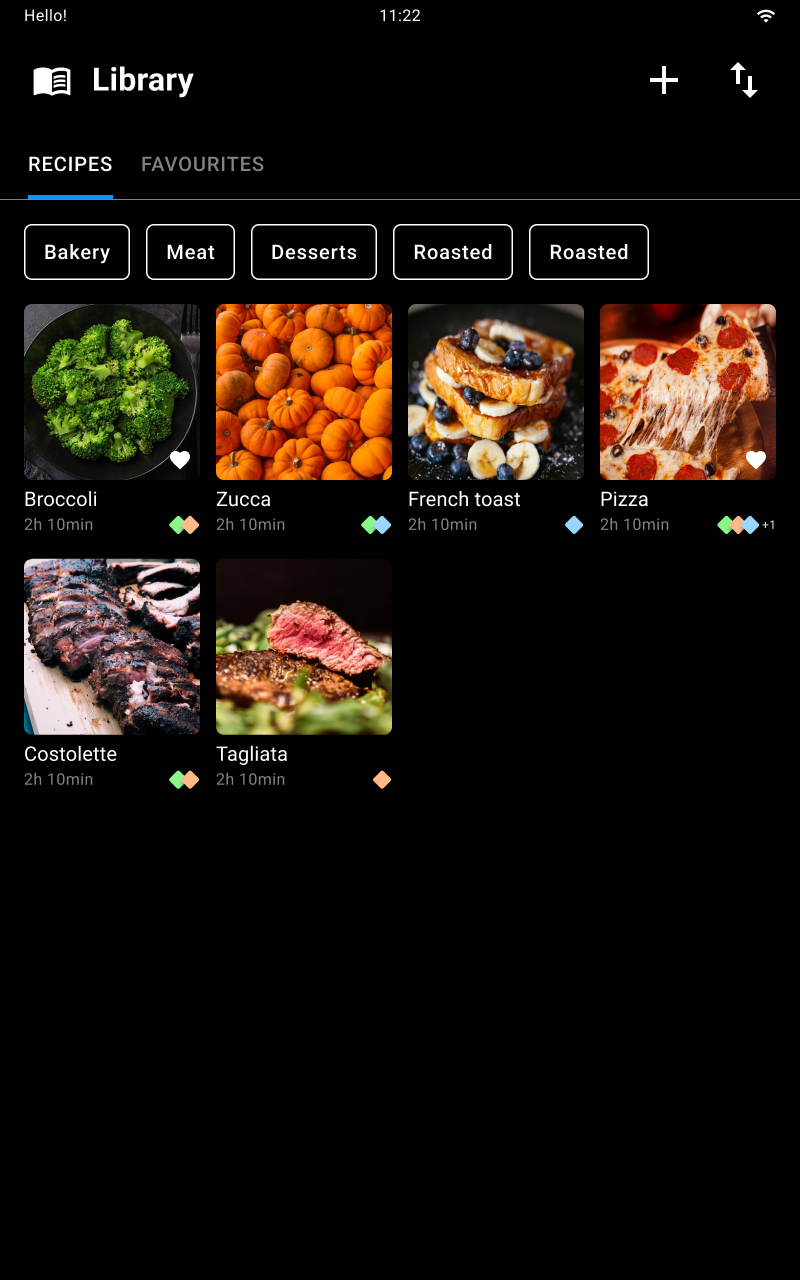
A page summarising the recipe’s cooking parameters appears.
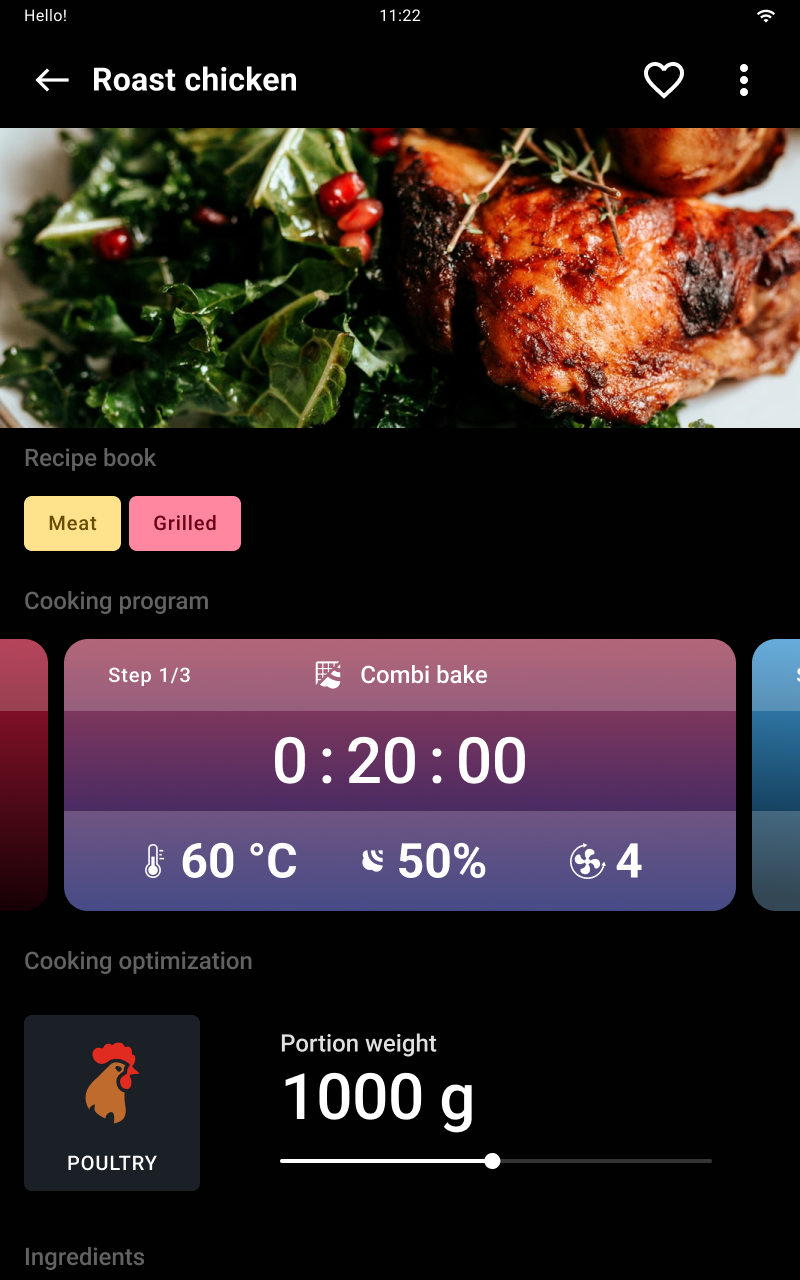
Use the filters (e.g. alphabetical order, “favourite” recipes, etc.) to make it easier to search for the recipe you want.
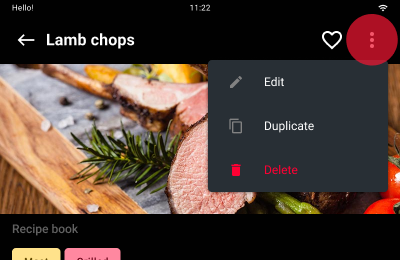
From the recipe card you can mark the recipe as a favourite by tapping the icon . By tapping the drop-down menu
 you can:

Tap start/stop to start the cooking cycle.
Tap the + new icon.
Set the recipe by adding:
Save the settings with save.
From the recipe card you can mark the recipe as a favourite by tapping the icon or, by tapping the drop-down menu, as edited, copied, shared with other users or deleted.

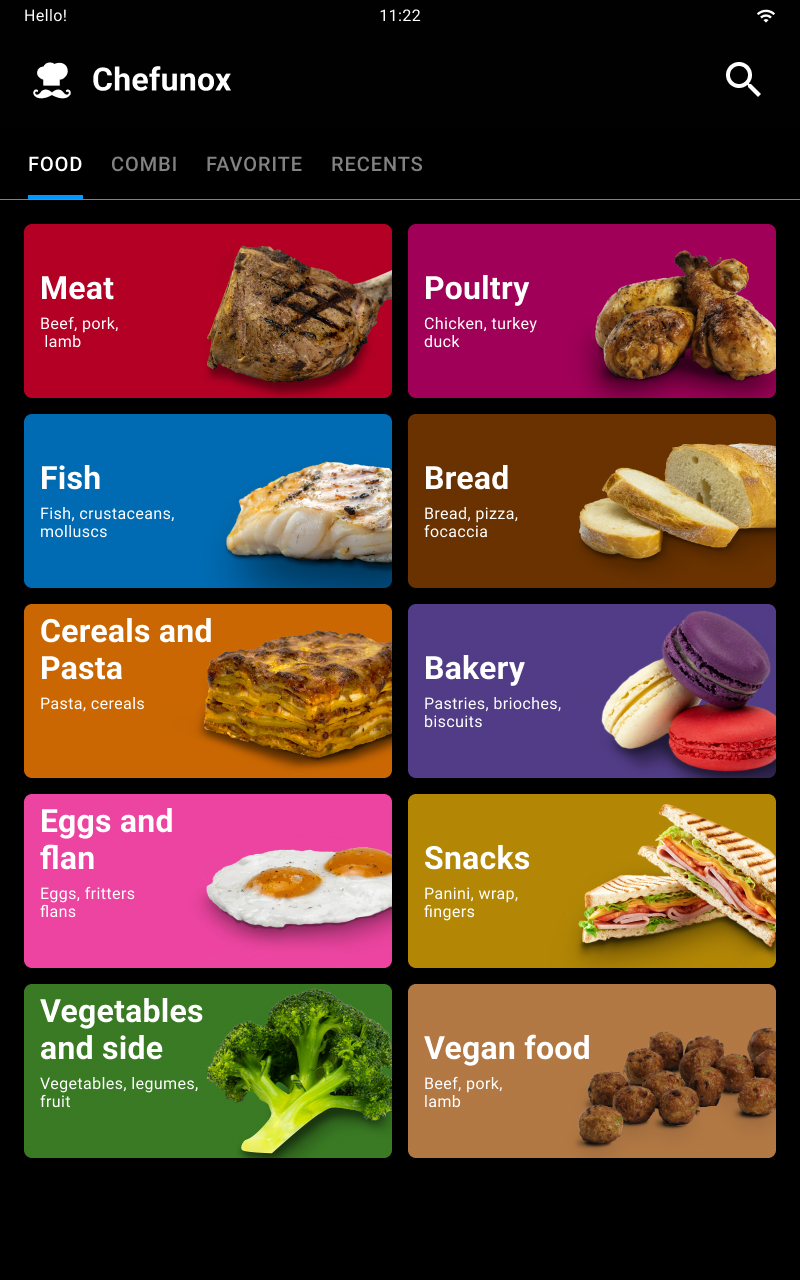
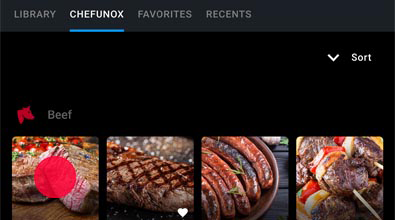
Chefunox - Speedunox allow you to use the recipes created and tested by the UNOX chefs to achieve excellent cooking results.
To select a recipe tap its icon. To make it easier to search, the recipes are divided up by food (e.g. poultry) or by type of cooking (e.g. COMBI).
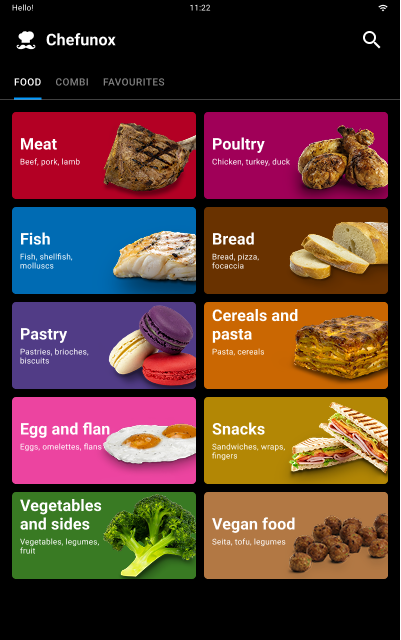
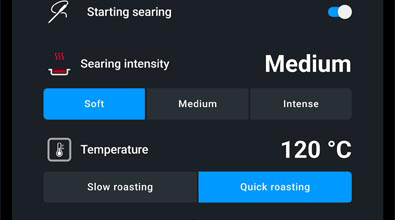
To achieve customised cooking cycles, optimised for the food to be cooked, depending on the chosen recipe, you can edit the preset parameters as you wish by changing, for example, the thickness of the food to be cooked, its weight, the external browning, etc.
Whenever any parameter is changed use the + save preset parameters button.
By tapping the button the parameters entered are permanently stored for future uses of the recipe.
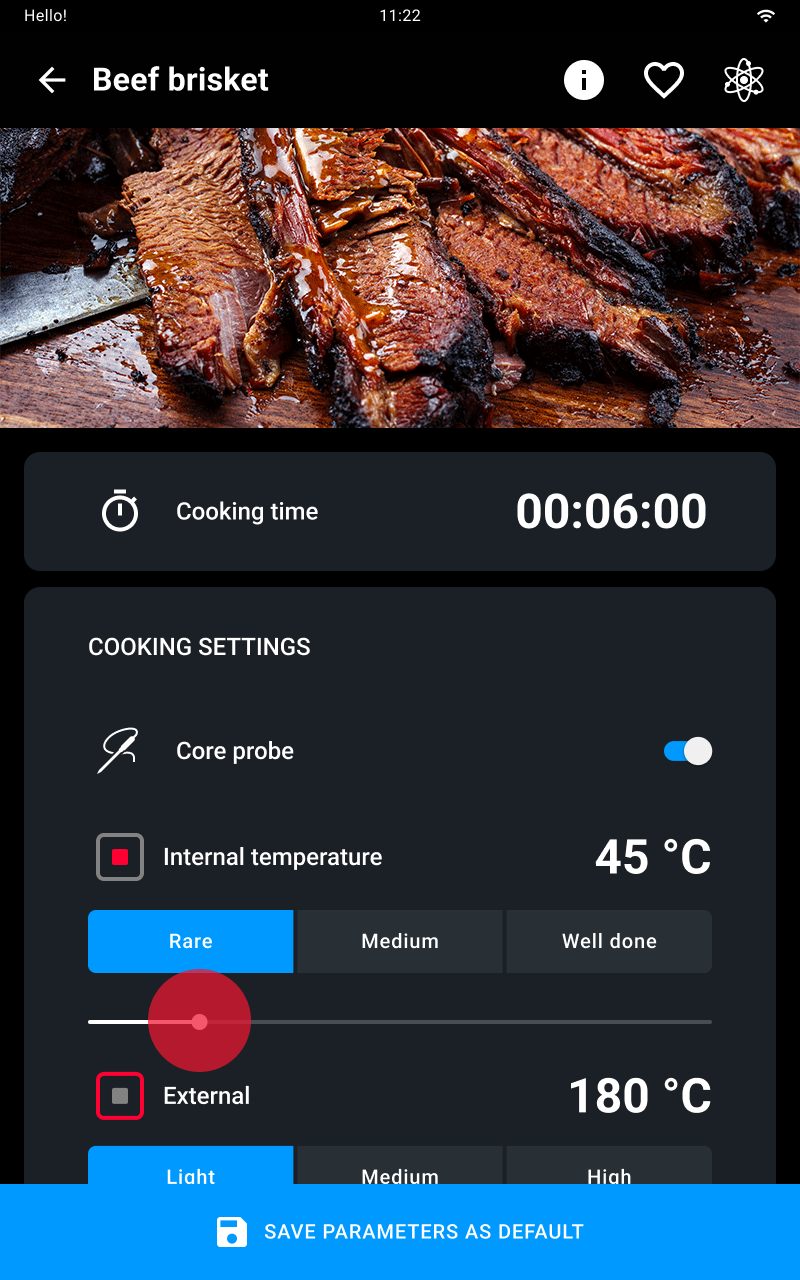
From the recipe card you can:
iconTap start/stop to start the cooking cycle.
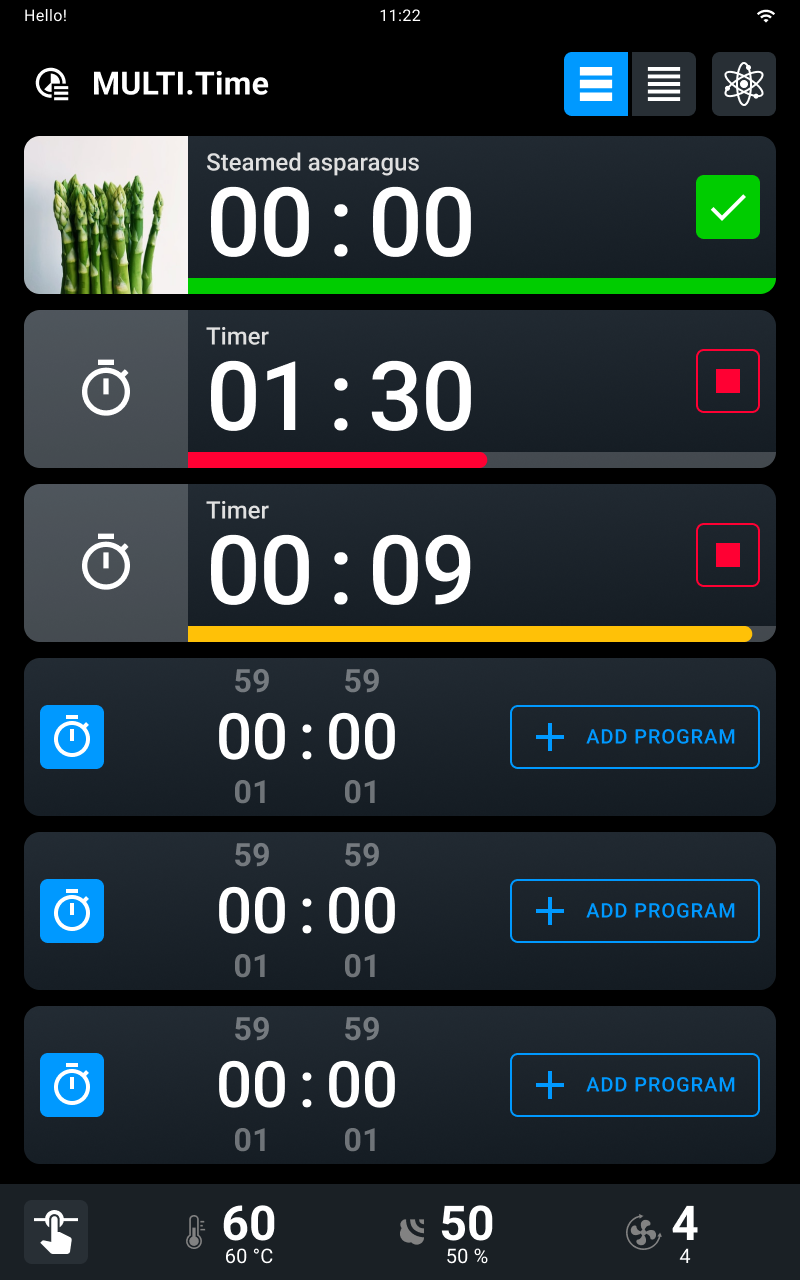
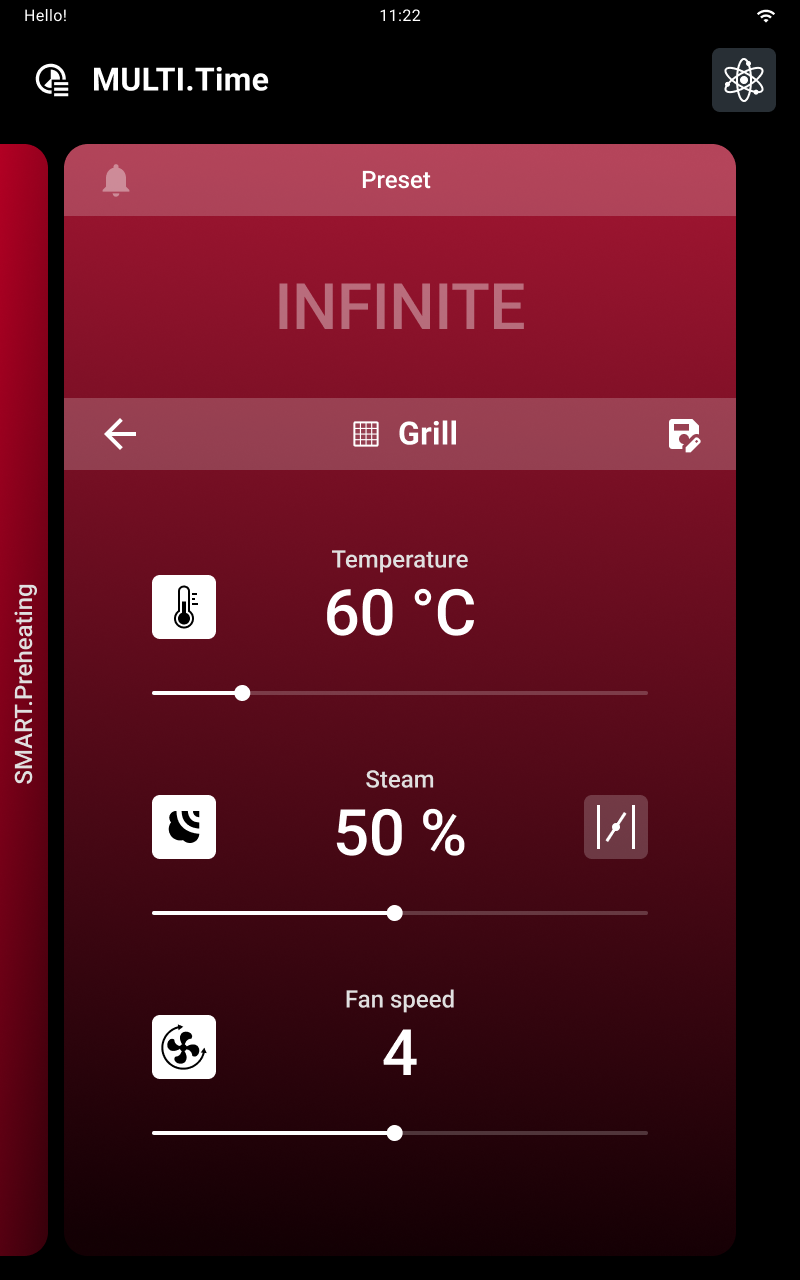
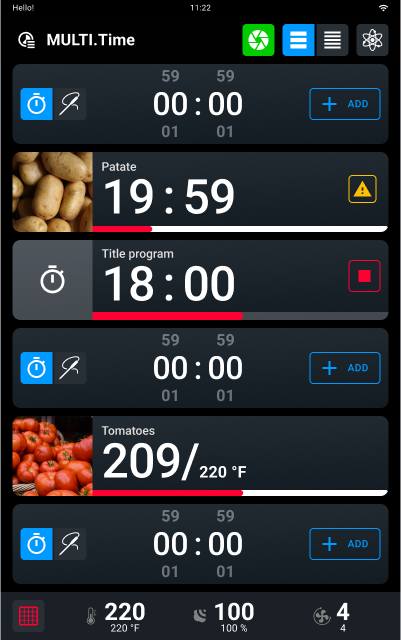
MULTI.Time allows you to cook at the same time foods that need different cooking times under equal conditions (temperature, humidity, etc.).
If you use this app, the oven maintains the temperature and humidity you have set for an indefinite period (continuous cycle). In addition, you are able to set up to 10 timers that will alert you when the relevant tray is ready.
To start or create a multitime cooking cycle, you must select either:
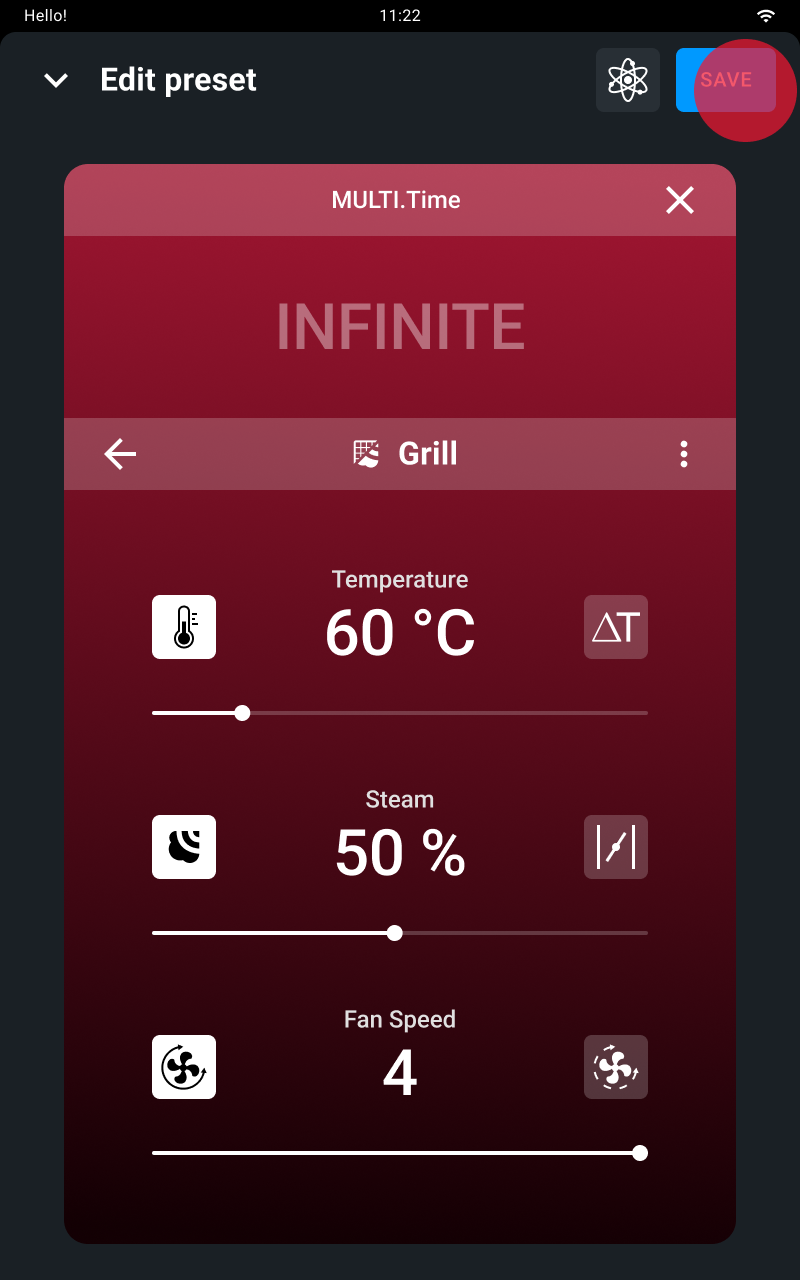
To select the preset program you want tap its name.
After selecting the preset cooking program, if you wish, you can edit the preset parameters to suit your needs.
The save button confirms the values entered.
Tap start/stop to start the cooking cycle: a manual or Smart.Preheating phase begins, depending on what you have previously set.
To stop preheating that’s in progress at any time, whether manual or SMART.Preheating, press the skip button and confirm.
See further information about preheating here.
When preheating is completed or after it has been stopped prematurely, a screen will remind you to put the food into the oven.
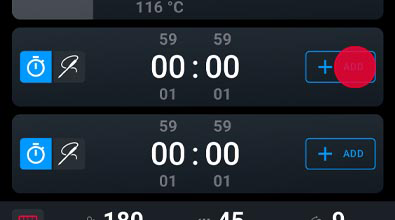
We recommended associating timer 1 with the tray at the top of the oven, timer 2 with the tray below and so on. This will help you to remember which tray needs to be taken out when a timer runs out. The card also offers the following buttons:
 button to display 5 timers
 button to display 10 timers
 button to activate or deactivate the technologies, see information about Unox Intelligence Performance here.
Tap the + add program icon.
You will be offered all the recipes that are compatible with the climate set that you have already chosen, divided into types (use the filters to make searching easier); tap the one you want to assign to the timer.
Enter the settings required to adapt the recipe to your needs and confirm with add.
Enter the duration of the timers that you need (up to a maximum of 5) from 0 mins to 9 hrs 59 mins 59 secs.
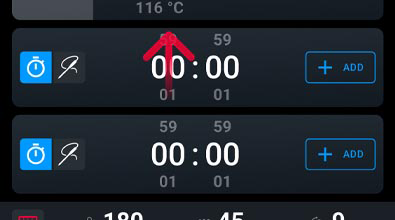
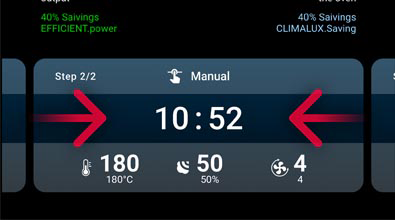
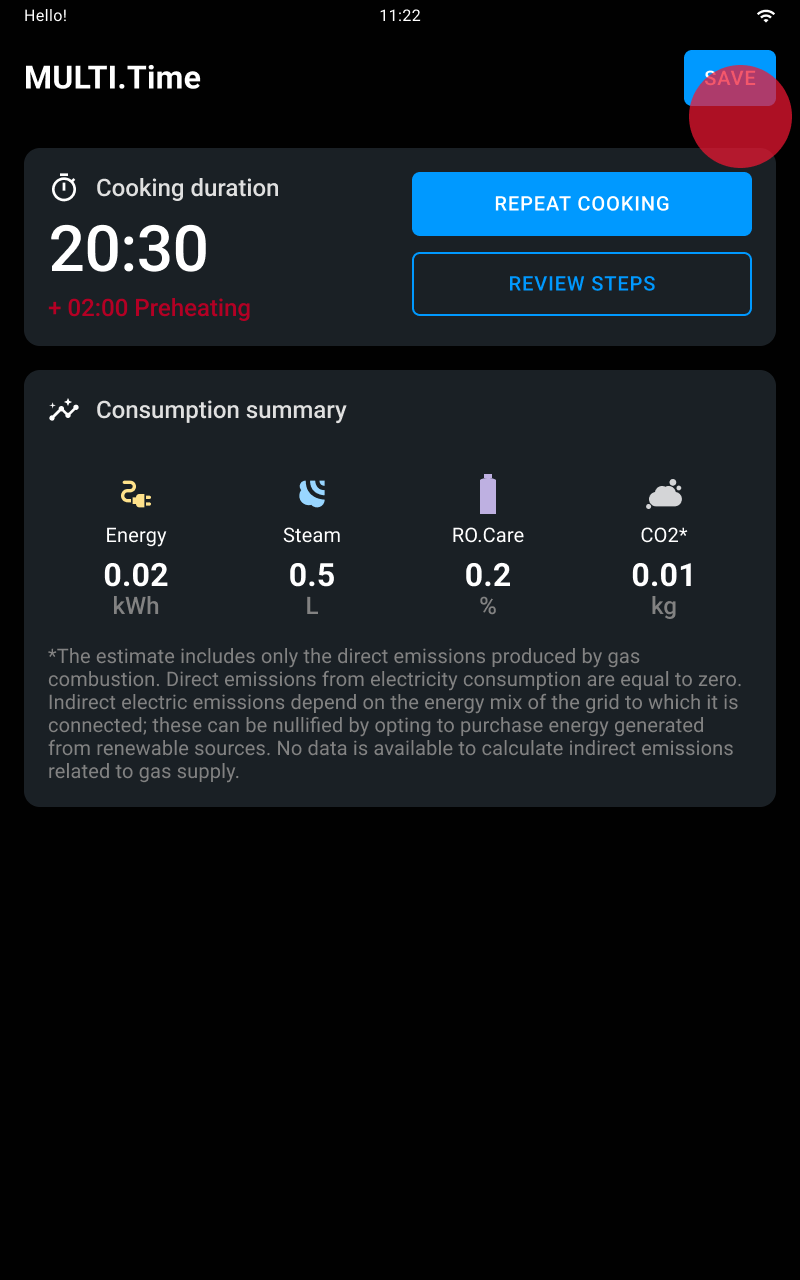
The picture shows a MULTI.Time cooking cycle that’s in progress.
By using this function, the oven maintains the set temperature and humidity indefinitely (continuous cycle).
When the time set by a timer runs out, a buzzer will tell you that the relevant tray is ready and you can take it out.
If you tap and hold down the start/stop button the cooking cycle in progress stops.
At the end of the cooking cycle a summary card will appear and a buzzer will sound that can be silenced by tapping the stop buzzer button.
Then a card appears summarising consumption.


By using this app you can find out activity data and your oven’s consumption. To display the whole card you have to drag it up or down.
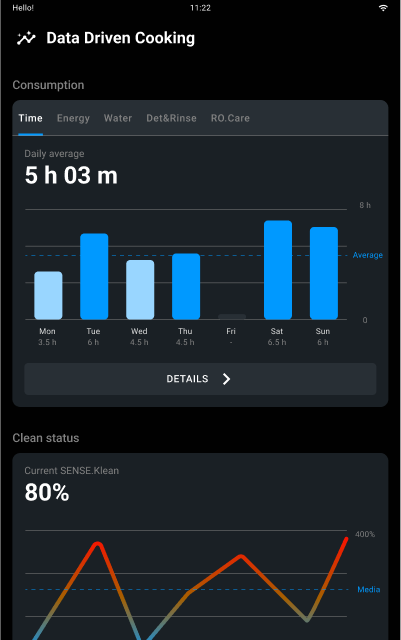
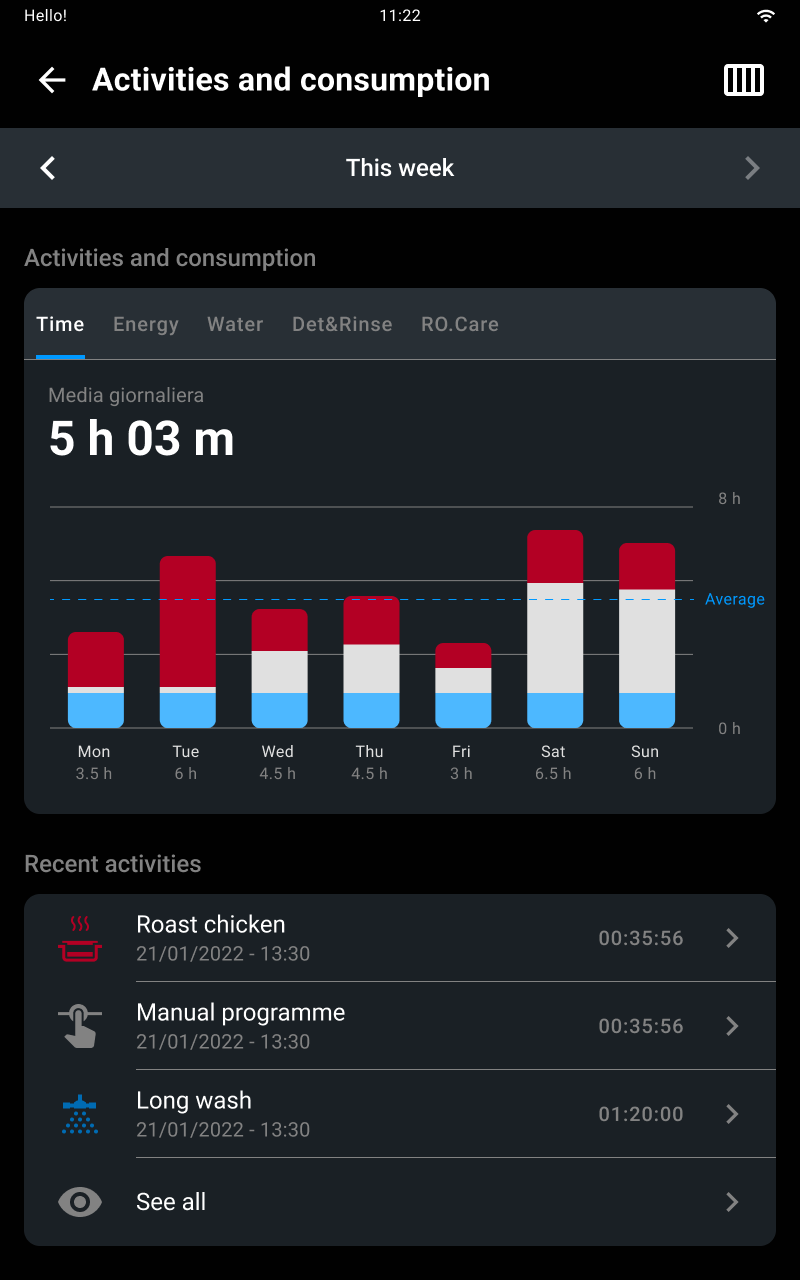
 weekly display
 monthly display
If you tap see all you will be able to see the whole list of programs that made up the hours of use of the oven in the week or month concerned.
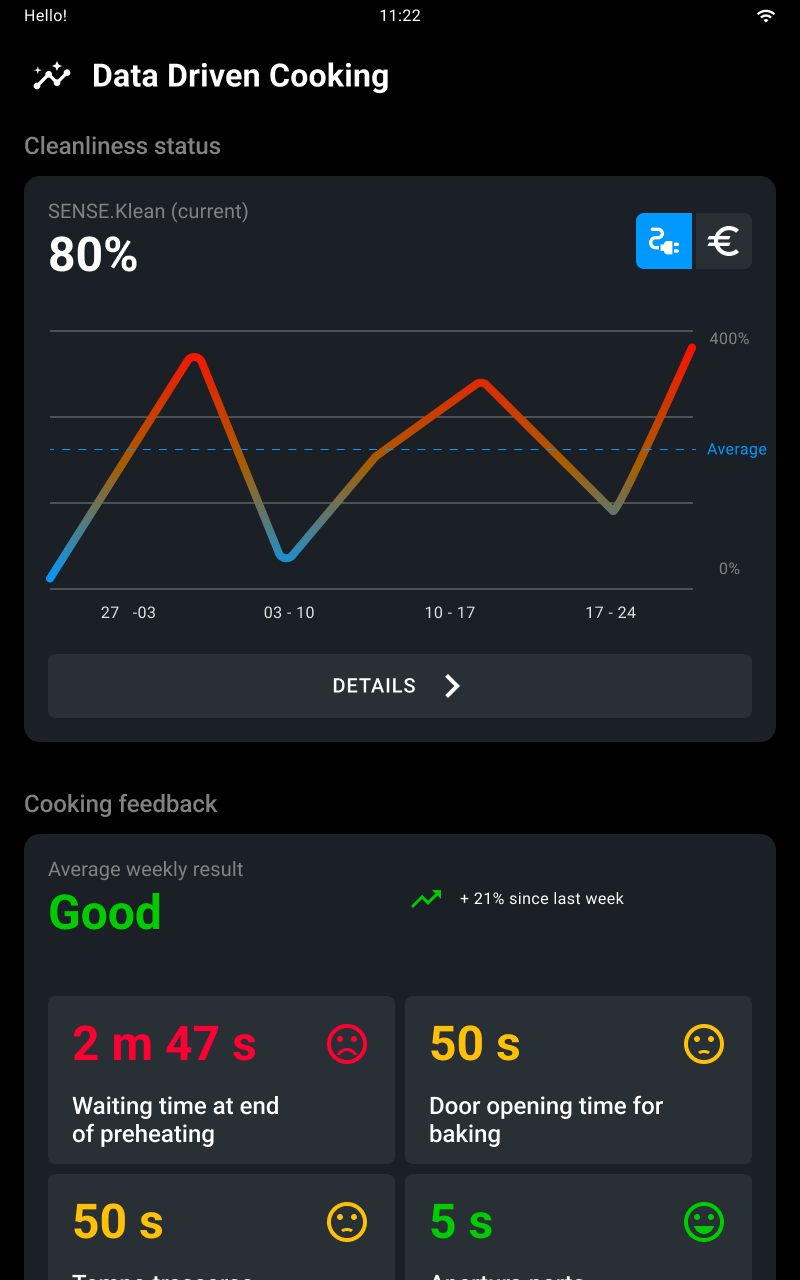
See what the oven’s state of cleanliness has been like in the last week or month. If you tap details you will see all the washes done and their details.

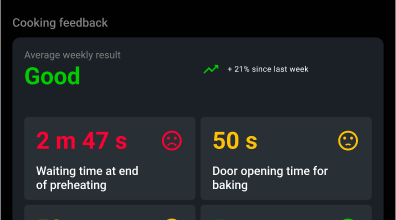
You can receive weekly cooking reports that will help you to improve management of your oven’s activities.
Information provided:

Do you need advice? Do you want to optimize the use of your oven? Do you want to perfect a cooking process? Do you need instructions for a recipe?
If you have activated the Premium* digital services you can book a Premium call with our Corporate Chefs directly from your oven and talk to them thanks to the internal microphone to receive up to 30 minutes a month of live advice. With the new Badge function you will be able to carry out instructions during the call, while with the Remote Control function you can allow the chef to set your oven remotely.
Do you need help? Book a session with our technical team directly from your oven and talk to them via the internal microphone.
With the purchase of a Digital.IDTM oven you can receive free Premium base training that will teach you all the tricks to take 100% advantage of your oven from the very first days after installation.
Our Active Marketing Chefs are available remotely to show you everything you need, from basic functions to the most advanced technologies.
* The Digital.IDTM Premium subscription includes HEY.Unox voice assistant, DIGITAL.Training, 30 min/month of COOKING.Concierge cooking support, live technical assistance and all the capabilities of the DDC Enterprise plan.
Any routine maintenance must be performed:
Carefully read the product safety data sheet before handling and using the detergent. Never touch the detergent with bare hands. The detergent must not come into contact with the skin, eyes or mucous membranes. In case of contact with the detergent, follow the instructions on the safety data sheet.
When cleaning any component or accessory NEVER use:
These substances could cause permanent damage to the appliance surfaces and catalysts. Never use these substances when cleaning the appliance substructure or the floor under the appliance. The volatile emissions from these compounds may still cause damage.
Before starting a cleaning cycle, make sure that there are NO trays in the oven cavity, otherwise the washing is ineffective.
Do not open the oven door during a washing cycle as this could cause injury to eyes, mucous membranes and skin because of contact with the cleaning chemicals used. These chemicals are sprayed by the rotor in the cavity and moved by strong air currents.
Routine cleaning and maintenance must be done by the user and NOT by children, especially where not supervised by an adult.
Do not tamper with the detergent tank, its connections to the oven and the internal and external water circuit for any reason as this could cause a risk of injury or death.
Periodically check for rust stains inside the oven cavity: if any are found, contact a service centre urgently because the water is probably damaging the oven; prompt action will extend the lifespan of the equipment.
Clean the appliance on a daily basis in order to maintain a good level of hygiene and to prevent the stainless steel from corroding or deteriorating.


Clean the control panel with a soft cloth and a little detergent designed for cleaning glass. For how to clean, follow the detergent manufacturer's instructions.
See how to start automatic wash programs here.
See how to refill the detergent here.
During periods of inactivity, unplug the appliance from the electricity and water supplies (if applicable). Rub a soft cloth lightly doused with Vaseline oil over all stainless steel surfaces and leave the appliance door slightly open.
Before reusing the appliance:
To ensure that the appliance is in perfect condition in terms of use and safety, maintenance and inspections should perform at least yearly by authorised service centre.
Find scheduled and preventive maintenance programs on the UNOX.MyCare & UNOX.MyCare CONNECT website. These are designed to guarantee high standards of quality and efficiency in UNOX ovens over time, and to avoid any unexpected hitches throughout the year.
Pursuant to article 13 of Italian Legislative Decree 49 of 2014 “Implementation of the WEEE Directive 2012/19/EU on waste electrical and electronic equipment”
The crossed-out wheelie bin symbol specifies that the product was placed on the market after 13 August 2005 and that at the end of its useful life it should be collected separately and not disposed of with other waste. All appliances are made with recyclable metal materials (stainless steel, iron, aluminium, galvanized steel, copper, etc.) in percentages above 90% by weight. Before disposal, ensure the appliance is unusable by removing the power cable and all compartment or cavity closure devices (where present). At the end of its useful life, the product must be disposed of in such a way as to reduce any negative impact on the environment and make efficient use of available resources. Prefer prevention, preparation for reuse, recycling and reclamation, and remember “the polluter pays”. Please remember that illegal or incorrect disposal of the product incurs penalties, as provided for by current legislation.
In Italy, WEEE appliances must be delivered to:
The EU Directive on WEEE appliances has been implemented differently by each country. Therefore, if you want to dispose of this appliance, we recommend you contact your local authority or dealer for information on the correct disposal method.
A note on the display tells you when you need to refill the Det&Rinse tank.
You must only refill the tank with 1 litre bottles of UNOX Det&Rinse™ Ultra detergent, the only one approved and tested for washing the oven cavity.
Wear gloves to prevent your hands from coming into direct contact with the detergent. The detergent must not come into contact with the skin, eyes or mucous membranes. In case of contact with the detergent, follow the instructions on the safety data sheet.
Put the tank back in until it can go no further. Dispose of the gloves without touching the areas wet with detergent.
The oven features an RO.Care softener filter that must be replaced once a year or after the treatment of a number of litres calculated using this formula:
Litres (L) = 13000 | 343.4 Us Gal / Temporary hardness (°DH) in relation to the hardness of the customer’s mains water.
In both cases a note on the display tells you when you need to replace it.
Go to the store on your device (Play Store on Android or App Store on iOS), search for the Digital.IDTM app and download it.
To create an account:
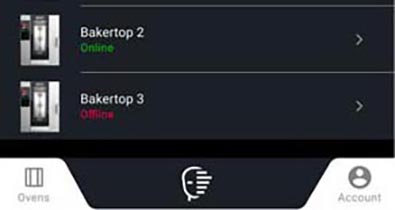
If you have already connected your ovens, after login a list of them will be displayed; see how to display and manage the list of ovens here.
If you haven’t connected an oven yet, see how to connect your ovens here.
The first time you log in to the account you have created, you need to connect your ovens so as to be able to display, monitor and manage them from the Digital.IDTM App.
Before connecting them, we advise you to try our virtual oven so as to test the process without worrying about making a mistake.
 on the bottom left. See how to display and manage the list of ovens here.
If you have more than one UNOX oven, repeat this process for each of them: then they will all be shown on the list of ovens. See how to display and manage a list of ovens here.
The Nav Bar lets you quickly navigate in the Digital.IDTM App:
button on the left lets you display and manage the list of ovens;
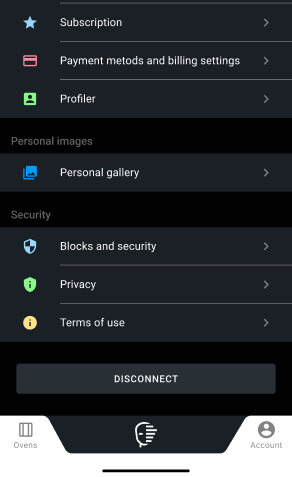
 button on the right lets you access your account and if necessary edit it. See how to manage your account here.
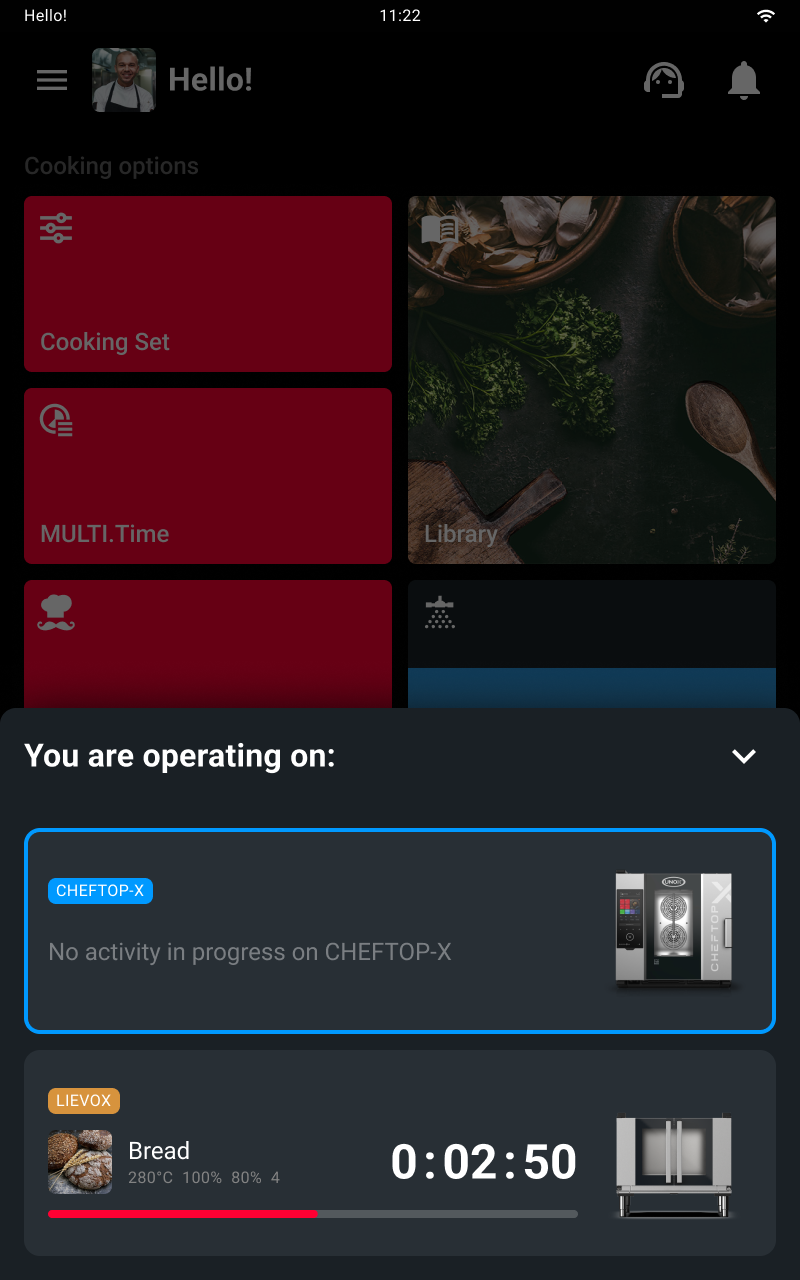
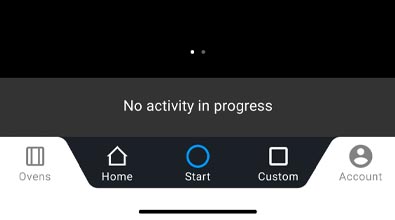
If you have selected an oven and are displaying its Home Page, the Nav Bar allows you to:

|
home button: access the oven’s Home Page; |
|
|
start/stop button: start up or stop an activity, for example a cooking cycle; |

|
custom button: access the system settings. |
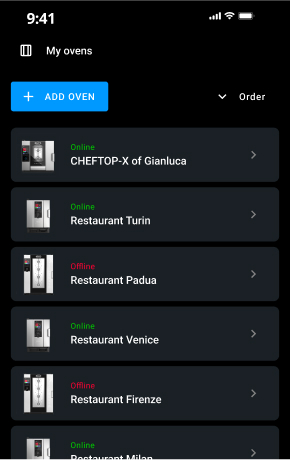
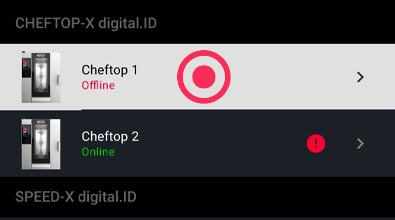
The list of ovens contains all the ovens you have connected through pairing. See how to connect your oven through pairing here.
Tap and hold down the name of an oven.
 , type the new name of the oven and confirm with apply.
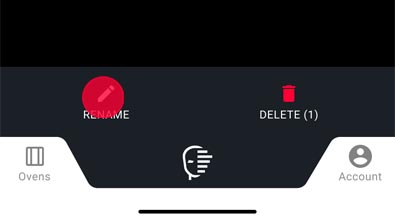
 and confirm with delete.
Tap account on the right.

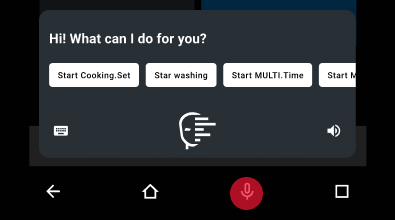
"Hey Unox, preheat to 180°C".
The Voice Control technology can recognise your voice, interpret your requests, and make the oven act accordingly. This enables you to give commands even when your hands are full.
Unox Voice Control can:
To activate or deactivate the technology, tap the voice  button
Go to settings > Voice control > language.
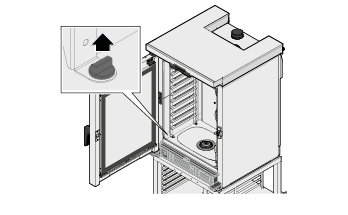
OPTIC.Cooking recognises the food in the oven and starts the correct programme using state-of-the-art technology. OPTIC. Cooking works in MULTI.Time mode only. It requires a subscription account associated with the oven on which it’s installed. Once positioned and turned on, the OPTIC.Cooking is coupled with its oven permanently. Any movement requires the intervention of authorised technical service for software unlocking and mechanical handling.
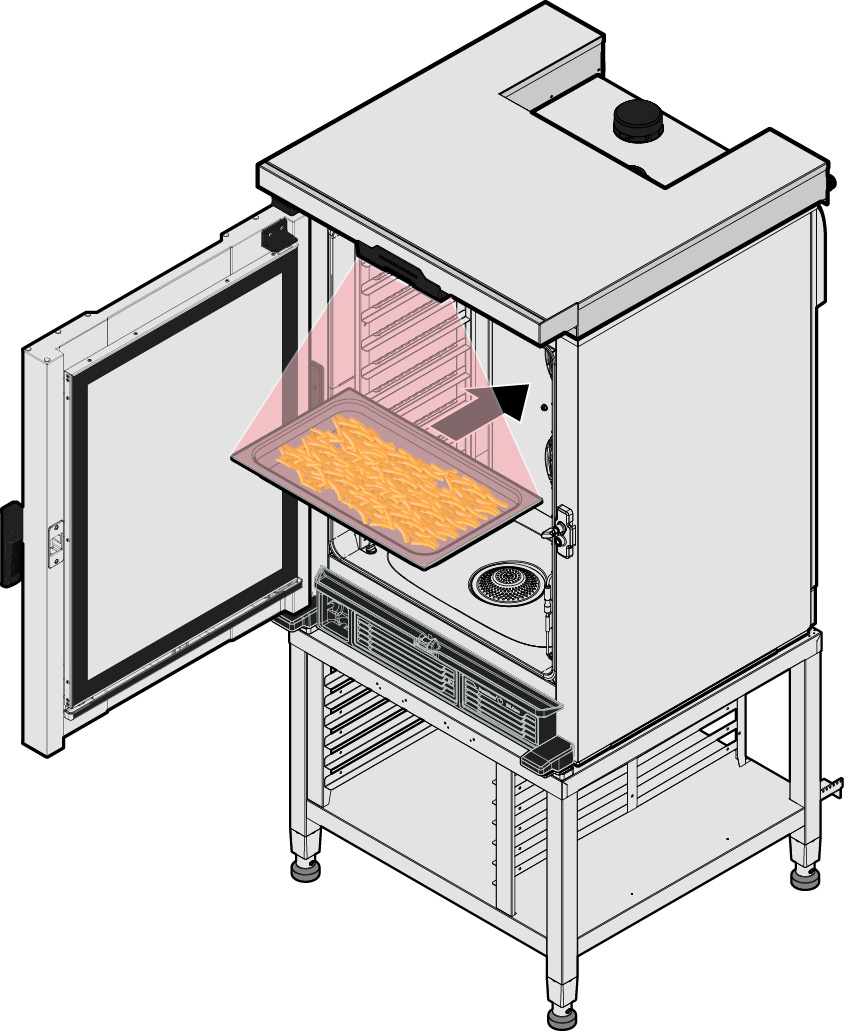
Even if it’s positioned and wired, the OPTIC. Cooking is not yet operative. The accessory maintains ventilation to protect itself from damage resulting from heat sources or external dirt not yet identified.
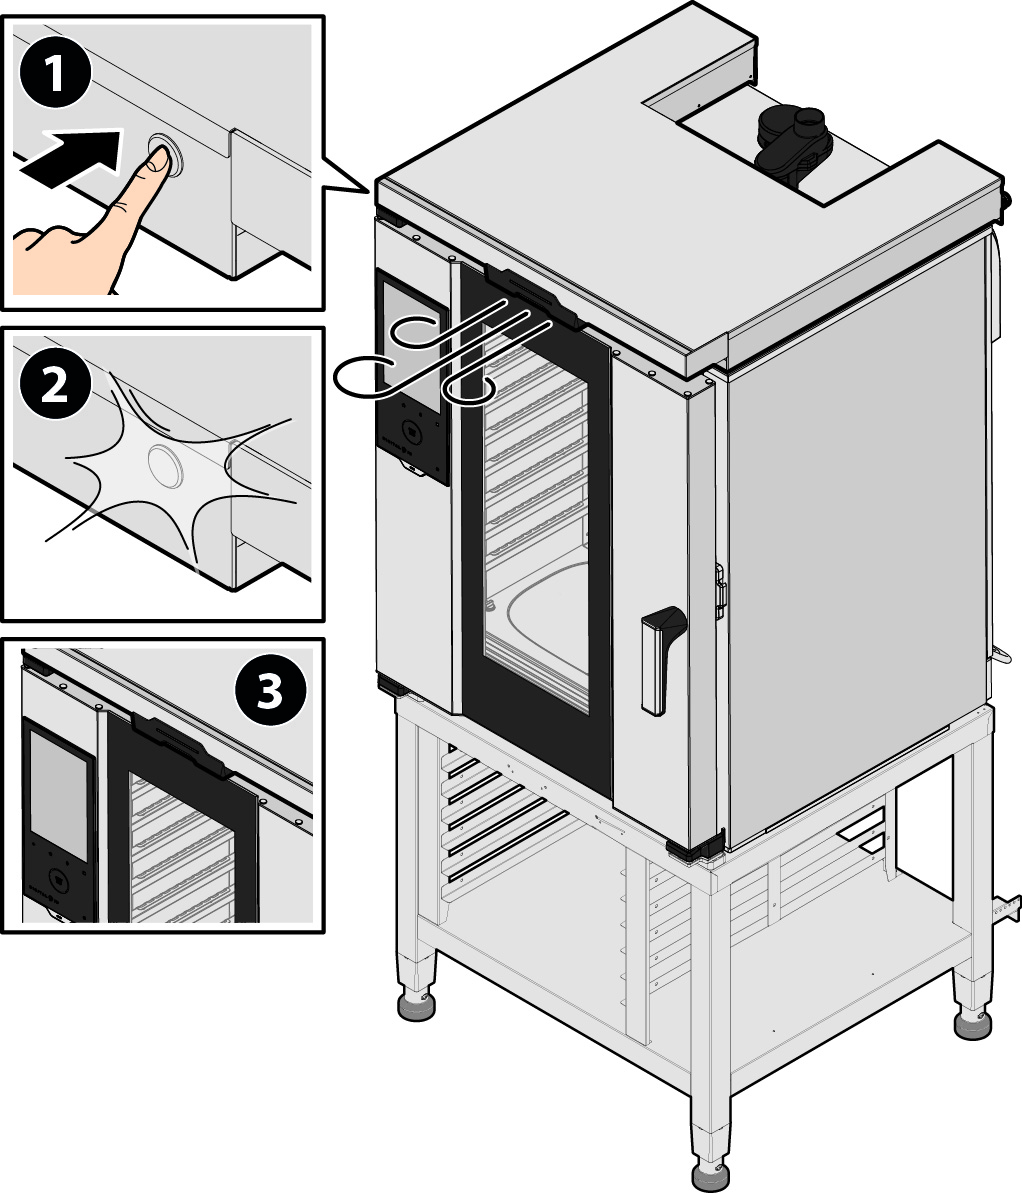
Turn the oven on.
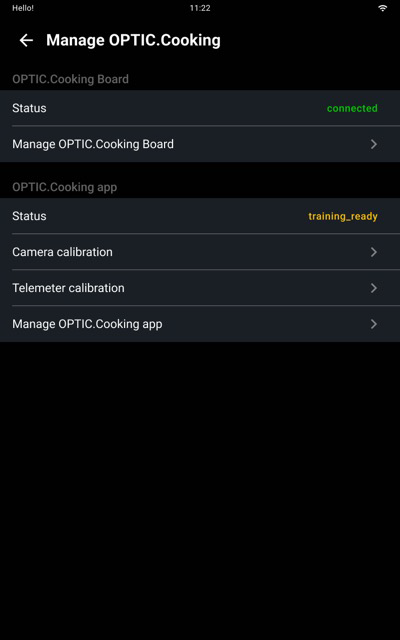
Continue the procedure if the status is “training_ready” or “all_ready”:
NOTE: The value of the pixel to crop field must remain 300.

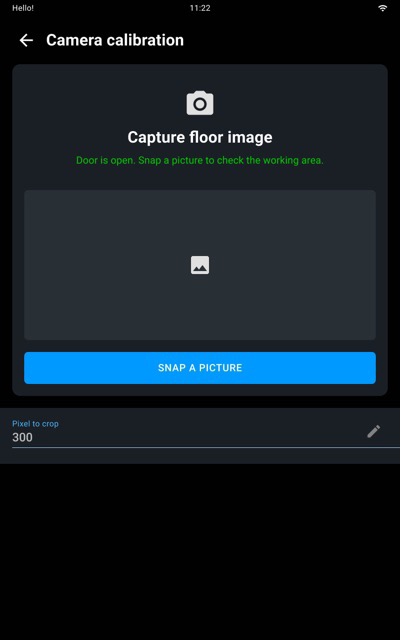

Sharp, not blurry photos
No foreign bodies (clean the optics, if necessary)
No sharp shadows on any tray levels
No local reflections on any tray levels
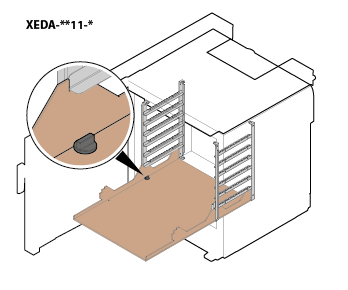
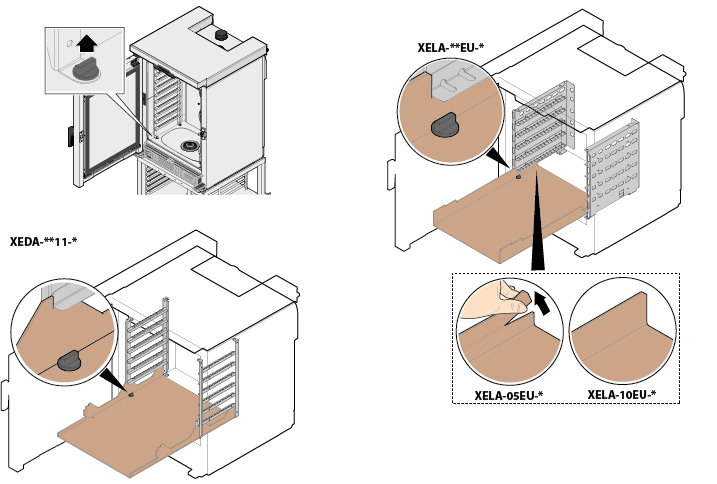
11. Check the camera images
Menu Service -> Accessories -> Manage OPTIC.Cooking -> Telemeter calibration
Follow the guided procedure.

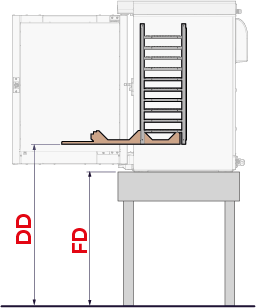
DD= distance of the calibration template from the floor
DF= distance of the oven from the floor
Click the “OPTIC.Cooking library” widget on the home page (if it’s not there, add it by pressing and holding on the home page and clicking ADD WIDGET at the bottom right). Follow the guided procedure on the display. To perform the training, apply the labels supplied to the tray supports in ascending order, from top to bottom.

Press the oven’s ON/OFF button and the OPTIC.Cooking turns off automatically. Do not disconnect the oven from the power supply!
Do not disconnect the oven from the power supply! Upon restarting the oven, the OPTIC.Cooking turns on automatically.
To restart the OPTIC.Cooking that was previously disconnected from the oven:
To force the restart of the OPTIC.Cooking:
To turn the oven on and off, tap the on/off button on the panel. After about 20 seconds, the Home Page will appear.

Go to settings > Updating software > Update the software.
You can only update the software if there are no cooking or washing programs in progress; after updating you will be asked to turn the oven off.
When starting the oven, tap the display repeatedly 5 times to turn on reset mode. You will be able to:
If the oven isn’t working, disconnect the appliance from any electrical and plumbing connections (where applicable) and contact an authorised UNOX Technical Assistance centre, providing the following information:

All our products are designed to last a long time, to assist you with the best possible technology and to make you capable of facing any challenge. However, unexpected events may arise; in these cases, the network of UNOX Authorized and Certified Technical Assistance Centers is always at your disposal to minimize downtime.
Click here to find UNOX Authorized Technical Assistance Centers
Find scheduled and preventive maintenance programs on the UNOX.MyCare & UNOX.MyCare CONNECT website.
With LONG.Life, you have the specialized assistance of our technicians and a 12-month warranty to cover labor and spare parts.
With UNOX LONG.Life5 you have the possibility to extend the warranty up to 5 years or 12,000 hours of use on spare parts and 24 months or 12,000 hours of use on labour. Contact UNOX for more information.
If you are a Premium customer * you can call our technical team directly from your oven and speak to our operators via the internal microphone. Moreover, thanks to the built-in chat and camera function of the Digital.IDTM app you can send messages and images to help the team diagnose and resolve your doubts more quickly and accurately.
* The Digital.IDTM Premium subscription includes HEY.Unox voice assistant, DIGITAL.Training, 30 min/month of COOKING.Concierge cooking support, live technical assistance and all the capabilities of the DDC Enterprise plan.
UNOX S.p.A Via E. Majorana, 22
35010 Cadoneghe (PD) Italy
Tel (+39) 049 86.57.511
Fax (+39) 049 86.57.555
info@unox.com
www.unox.com
Copyright 2023 UNOX S.p.A. All rights reserved. Companies’ Register Padua n° 04230750285 - Economic Administrative Index Padua 372835 - Share capital € 5,000,000 fully paid up - VAT No. / Tax Code 04230750285
LI3126A
All images used are for illustrative purposes only.
All features indicated in this catalogue may be subject to change and could be updated without notice.